Device Activation & Classes
Overview
A LoRaWAN® device must be activated before TEKTELIC KONA Core Network Server accepts its data. Activation gives the device a device address, the DevAddr, and session keys. KONA Core supports two activation methods, OTAA and ABP. We recommend OTAA.
The device class decides when the device listens for downlinks. KONA Core supports Class A, Class B and Class C. The class tells you how fast a downlink reaches the device.
How it works
Activation methods
| OTAA (over-the-air activation) | ABP (activation by personalization) | |
|---|---|---|
| What you enter in KONA Core | Device EUI, Application EUI and Application Key | The same fields, plus Device address, Network session key and Application session key on the Activation tab |
| Session keys | New keys at every join | Fixed for the life of the device |
| Device address | Assigned by the network at every join | Fixed, set in advance on the device and in KONA Core |
| When to use | Recommended. Every device that supports it | Only when the device doesn't support OTAA |
Use OTAA. The device gets new session keys every time it joins, so a leaked session key is valid only until the next join. KONA Core also assigns the device address, so you don't manage addresses yourself. TEKTELIC devices are delivered with the DevEUI, JoinEUI and AppKey that OTAA needs.
Use ABP only when the device doesn't support OTAA. An ABP device keeps the same keys and address for its whole life. In LoRaWAN, the network rejects an uplink whose frame counter was already used. A device that resets its counters may lose its uplinks.
For frame counters, see Device Session & Frame Counters.
For what each key protects and how KONA Core stores keys, see Security & Keys.
Where you set the activation method
You choose the method when you add a device. In the Add Device dialog, on the Device details tab:
- Leave ABP activation cleared for OTAA. This is the default.
- Select ABP activation for ABP. The UI describes it as follows: the device is activated manually, and OTAA is disabled. Then enter the session values on the Activation tab: Device address, Network session key and Application session key. The Activation tab also shows the Uplink frame-counter and the Downlink frame-counter.
An application also has an ABP activation option, on its Advanced network settings tab. Its hint says that the devices of the application are then activated manually, and OTAA is disabled. When Use application settings is selected on a device, the application's ABP activation setting applies. When it is cleared, the device uses its own activation setting.
For the steps, see Onboard a TEKTELIC Device and Onboard a Third-Party Device. To add devices from your own system, use Save device.
The OTAA join flow
An OTAA device joins the network in four steps. This is standard LoRaWAN behavior.
- Join request. The device sends a join request with its DevEUI, its JoinEUI and a nonce, the DevNonce. The device signs the request with its AppKey.
- Check. KONA Core finds the device by its DevEUI and checks the signature with the AppKey you entered. LoRaWAN requires the network to reject a join request with a DevNonce the device used before, so a recorded request can't be replayed. KONA Core rejects a repeated DevNonce without sending a Join Accept. If the device keeps reusing values after a restart, contact its manufacturer for a firmware fix.
- Join accept. KONA Core assigns a device address and sends a join accept through a gateway.
- Session keys. The device and the Join Server of KONA Core derive the session keys from the AppKey and the join messages. The session keys are never sent over the air.
After the join, the device sends its uplinks with the new device address and session keys. A device joins again after a reset or a power cycle, and it may rejoin on its own schedule. Each join starts a new session with new keys and frame counters at 0.
An application has a Clear downlink queue upon join option on its Advanced network settings tab. When it is selected, a new join removes the downlinks that are still waiting in the device's queue. It is cleared by default in the Add Device dialog, and the same option is on the device's tab.
Device classes
Every LoRaWAN device sends uplinks when it needs to. The class decides when it can receive downlinks.
| Class | When the device can receive a downlink | Typical use |
|---|---|---|
| Class A | Only in two short receive windows, RX1 and RX2, right after each of its uplinks. | Battery-powered sensors. Lowest power use. |
| Class B | In the Class A windows, plus in scheduled ping slots. The ping slots are timed by beacons that the gateways send. | Battery-powered devices that must receive downlinks at known times. |
| Class C | Almost all the time: the receive window stays open except while the device transmits. | Mains-powered devices, such as actuators, that must react quickly. |
In LoRaWAN, every device supports Class A. Class B and Class C add receive windows on top of Class A.
In practice, a downlink to a Class A device waits in the queue until the device sends its next uplink. If the device sends an uplink once an hour, the downlink can take up to an hour to arrive. Class B delivers it at the next ping slot, and Class C as soon as the device isn't transmitting. For the downlink queue and how to send downlinks, see Send Downlinks.
Where KONA Core sets the class
You select the class through the device model when adding a device: the Add Device dialog has no class field. In Add Device Model, Device class is required, with the options Class A, Class B and Class C. Changing a model's class doesn't affect devices already added with it. The Devices page shows the device's class in Device class.
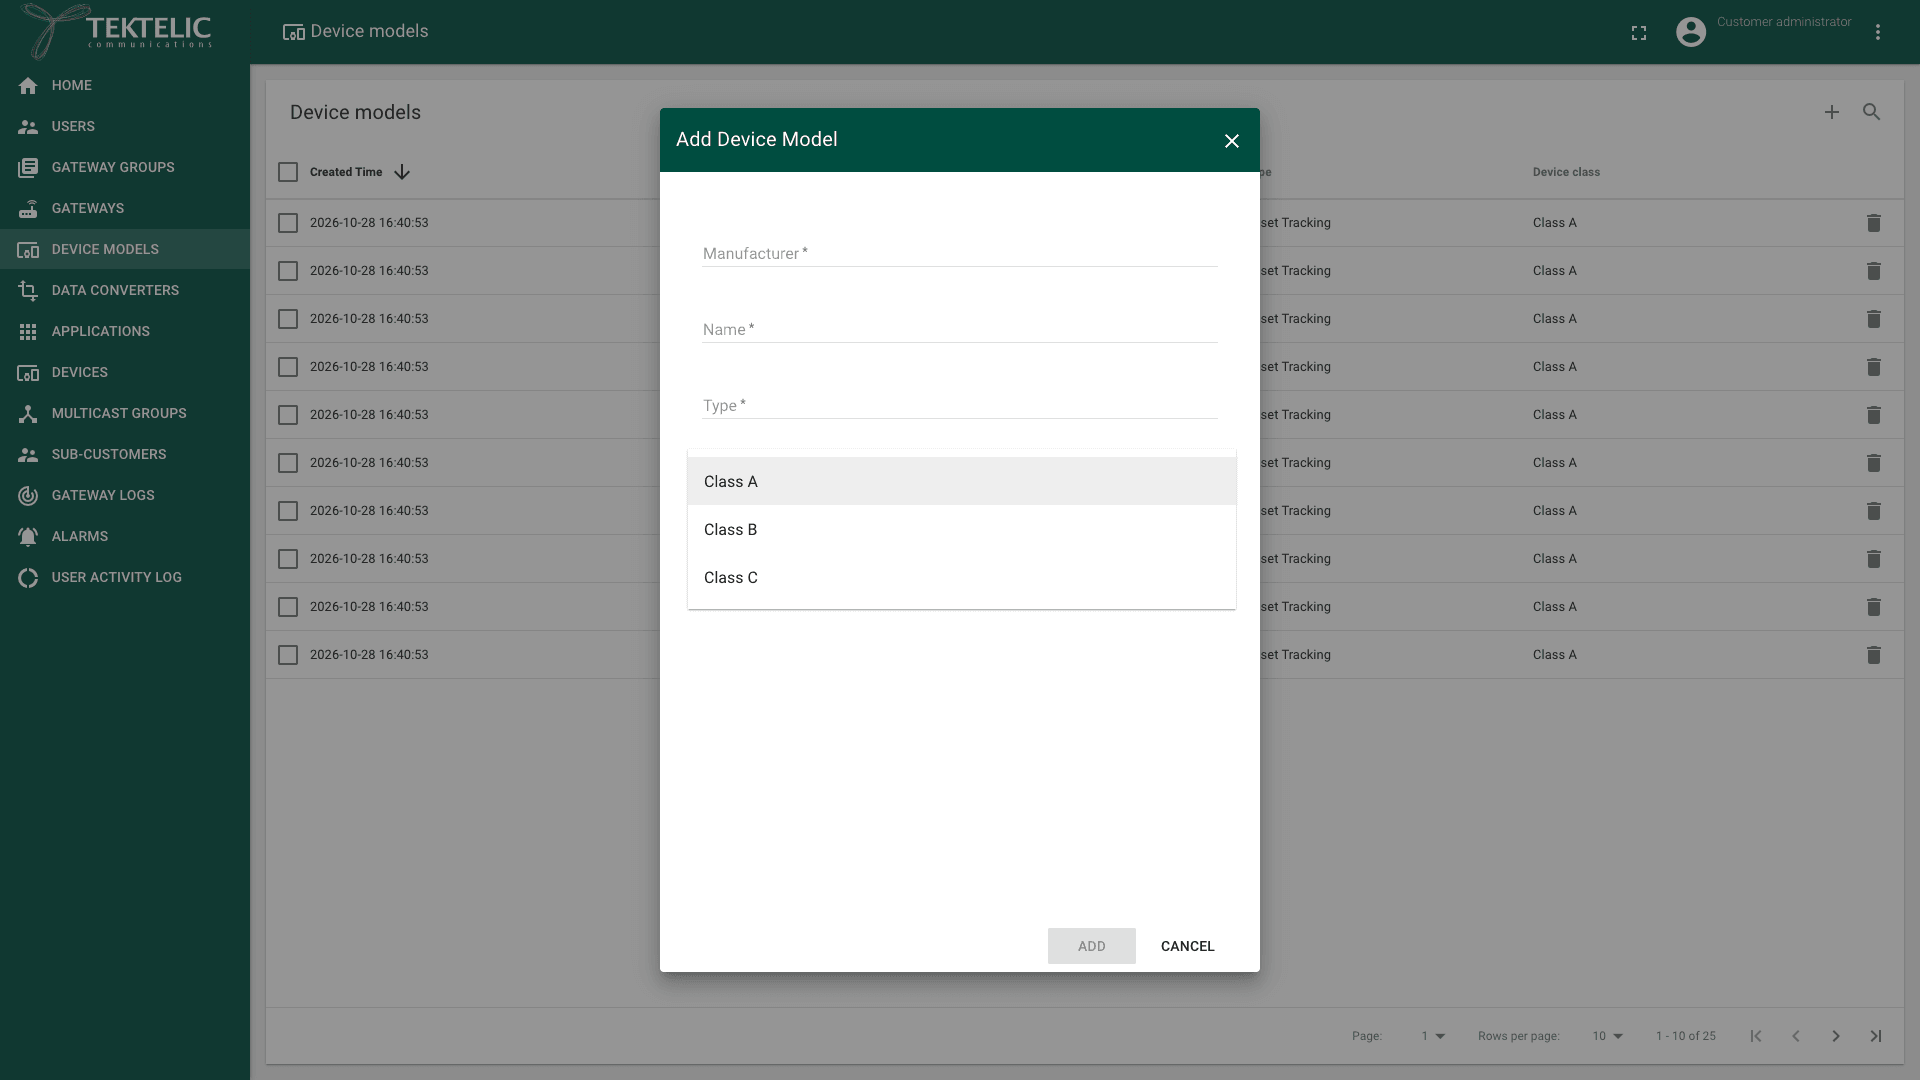
Select the class that the device firmware runs. Check the device's user guide: a mismatch means KONA Core sends downlinks when the device isn't listening. For TEKTELIC devices, use the TEKTELIC device model, which has the class set. See Manage Device Models.
The receive windows have their own settings on the Advanced network settings tab of an application or device:
- Receive window: RX1 or RX2 (one second after RX1).
- Receive window delay.
- Class B settings: Beacon frequency in MHz, Ping slot data rate and Ping slot frequency in MHz.
See Network Settings.
Supported device classes
KONA Core supports the device classes Class A, Class B and Class C. The class options in the UI and the deviceClass values in the API (CLASS_A, CLASS_B, CLASS_C) confirm this.