Uplink & Downlink Data Flow
Overview
Follow an uplink from the device to your system, and a downlink back to the device, through TEKTELIC KONA Core Network Server. At each step you learn what KONA Core checks, where a message waits, and where you see it in the UI. Use it to tell a real problem from a normal LoRaWAN® delay.
For the parts of KONA Core named here, see Architecture Overview.
How it works
The path at a glance
| Step | Uplink | Downlink |
|---|---|---|
| 1 | The device sends the uplink over LoRa® radio. | Your system, the UI or the REST API sends the downlink. |
| 2 | Every gateway in range receives it and forwards it to KONA Core. | For a downlink through an integration, the data converter encodes the data into bytes. |
| 3 | The network server checks the uplink and keeps one copy (deduplication). | The network server puts the downlink in the device's downlink queue. |
| 4 | The device's application passes it to each of its integrations. | The network server waits for the device's next receive window. |
| 5 | Each integration's data converter decodes the bytes. | A gateway transmits the downlink. |
| 6 | The integration delivers the data to your system. | For a confirmed downlink, the device acknowledges it in a later uplink. |

Uplink path
1. Reception by gateways. A device doesn't send to a specific gateway. Every gateway in range that listens on the uplink's frequency receives it. A gateway doesn't read the message. It adds radio data, such as the signal strength (RSSI) and the signal-to-noise ratio (SNR), and forwards it to KONA Core over MQTT or UDP.
2. Checks in the network server. KONA Core accepts the uplink only when it passes the LoRaWAN checks. Each failed check raises an event, for example:
| Check | Event when it fails |
|---|---|
| The device is known to KONA Core. | UNKNOWN_DEVICE |
| The message integrity code (MIC) is valid, so the message comes from the device and wasn't changed. | LORA_MIC_FAILURE |
| The uplink frequency is valid for the device. | INVALID_UL_FREQUENCY |
| The device doesn't send more often than allowed. | TOO_FREQUENT_UPLINKS |
The network server also checks the frame counter, to reject replayed messages. You can turn this check off for one device with Enable relax frame-counter, in the device's Advanced network settings tab. We don't recommend it: as the UI warns, it lets an attacker replay old messages. For the events and their severities, see Alarms & Events Reference.
3. Deduplication. When several gateways receive the same uplink, the network server gets several copies of it. In a LoRaWAN network, the network server keeps one copy and passes only that copy to the application. The Real-time packets tab shows one row per receiving gateway.
4. LoRaWAN processing. The network server reads the MAC commands in the uplink and runs ADR when Enable ADR is selected. You see each uplink in the device's Real-time packets tab, with the Gateway, the radio data, the Port and the raw Payload. The C/U column shows C for a confirmed message and U for an unconfirmed one.
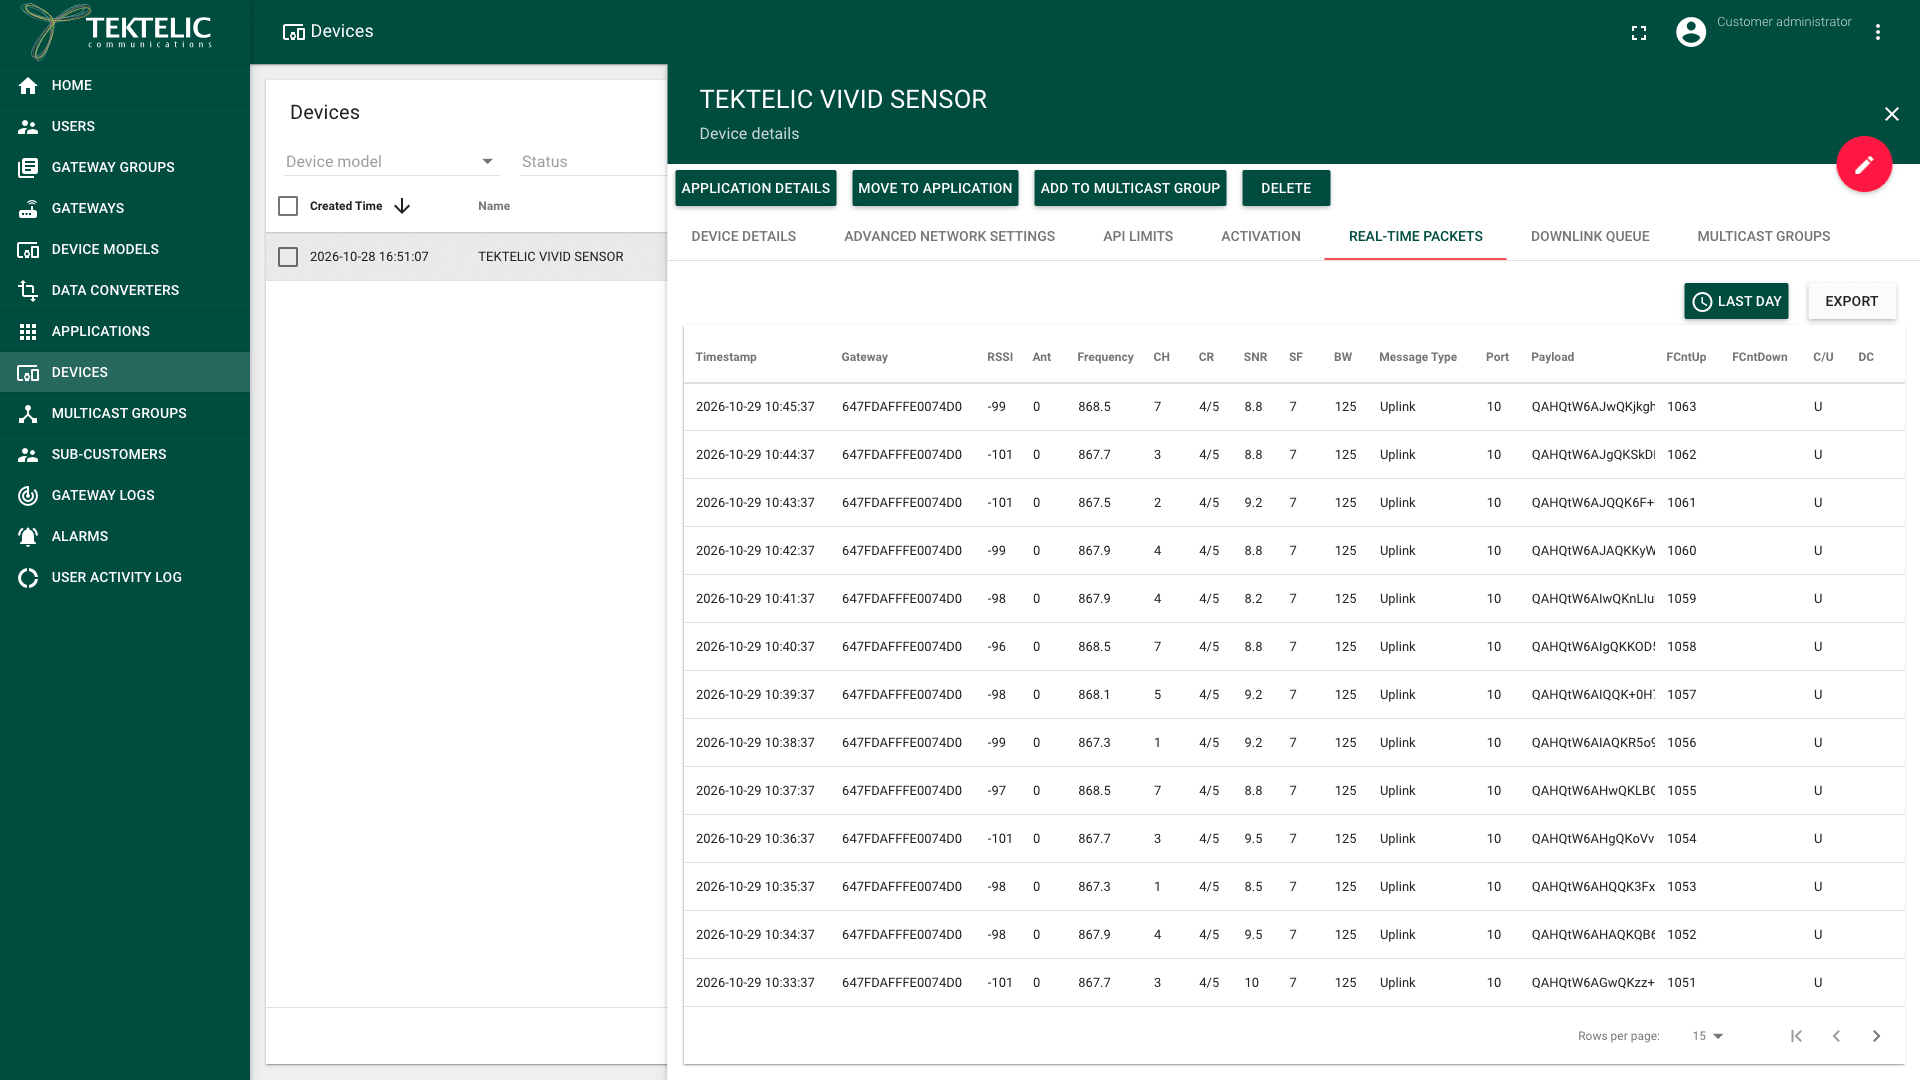
5. Routing to integrations. The network server passes the uplink to the application of the device. Each integration of that application checks its filters:
- Allow messages with ports: the integration takes only uplinks on the ports (FPort) you set, or every port with Allow all ports.
- Send empty payload: decides whether uplinks without data are delivered.
6. Decoding. The integration's data converter runs its decoder on the payload bytes. A failure raises the event INTEGRATION_UL_DECODING_FAILURE. The data converter form states an execution timeout of 100 ms. A decoder that exceeds it 5 times within 600 seconds is banned for 30 minutes.
A banned decoder raises DECODER_BANNED, and KONA Core skips its runs. KONA Core counts each decoder run, each failure, each timeout and each skipped run. To write a decoder, see Write a Decoder.
7. Forwarding. The integration delivers the decoded data to your system:
- HTTP_V2 sends an HTTP request to your server.
- MQTT_V2 publishes to the Push Topic on your MQTT broker.
- MQTT_BROKER publishes on the KONA Core MQTT broker, where your system subscribes.
If a delivery fails, the integration tries again. Its Retry scheme sets the delays between attempts: you select steps from 5 min to 48 h. A new integration starts with 5 min, 30 min and 1 h. Changing the scheme doesn't cancel retries that are already scheduled. If the last retry fails, KONA Core drops the message and increases Dropped by one in the integration's UL delivery statistics.
The message body and its fields are described in Message Formats. To see deliveries, failures and retries, see Integration Monitoring.
Join: the first uplink and downlink
Before an OTAA device sends data, it joins the network. It sends a join request, and KONA Core answers with a join accept in a downlink. During the join, the device and the Join Server of KONA Core derive the session keys. You see the result in the device's Activation tab.
The Uplink frame-counter shows -1 until KONA Core receives the first uplink. For join and device classes, see Device Activation & Classes.
Downlink path
1. Sources. A downlink reaches the device's queue in one of three ways:
- From the UI: in the device's Downlink queue tab, select Add downlink to queue. You enter the payload in Base64.
- From the REST API: with Add downlink to queue.
- From an integration: your system sends data to the integration. The integration's data converter runs its encoder to turn the data into bytes. If encoding fails, KONA Core raises
INTEGRATION_DL_ENCODING_FAILURE. An invalid downlink raisesINVALID_DL_PAYLOAD.
For each way, step by step, see Send Downlinks.
2. Queue. Each device has its own downlink queue. Each entry has a Message ID, a Port, a Confirmed flag and the Data. Queue capacity and the KONA Core payload size limit are configurable. When the queue is full, a newly added downlink is dropped. A downlink that exceeds the payload limit is also dropped. For the events and remaining configuration questions, see Send Downlinks.
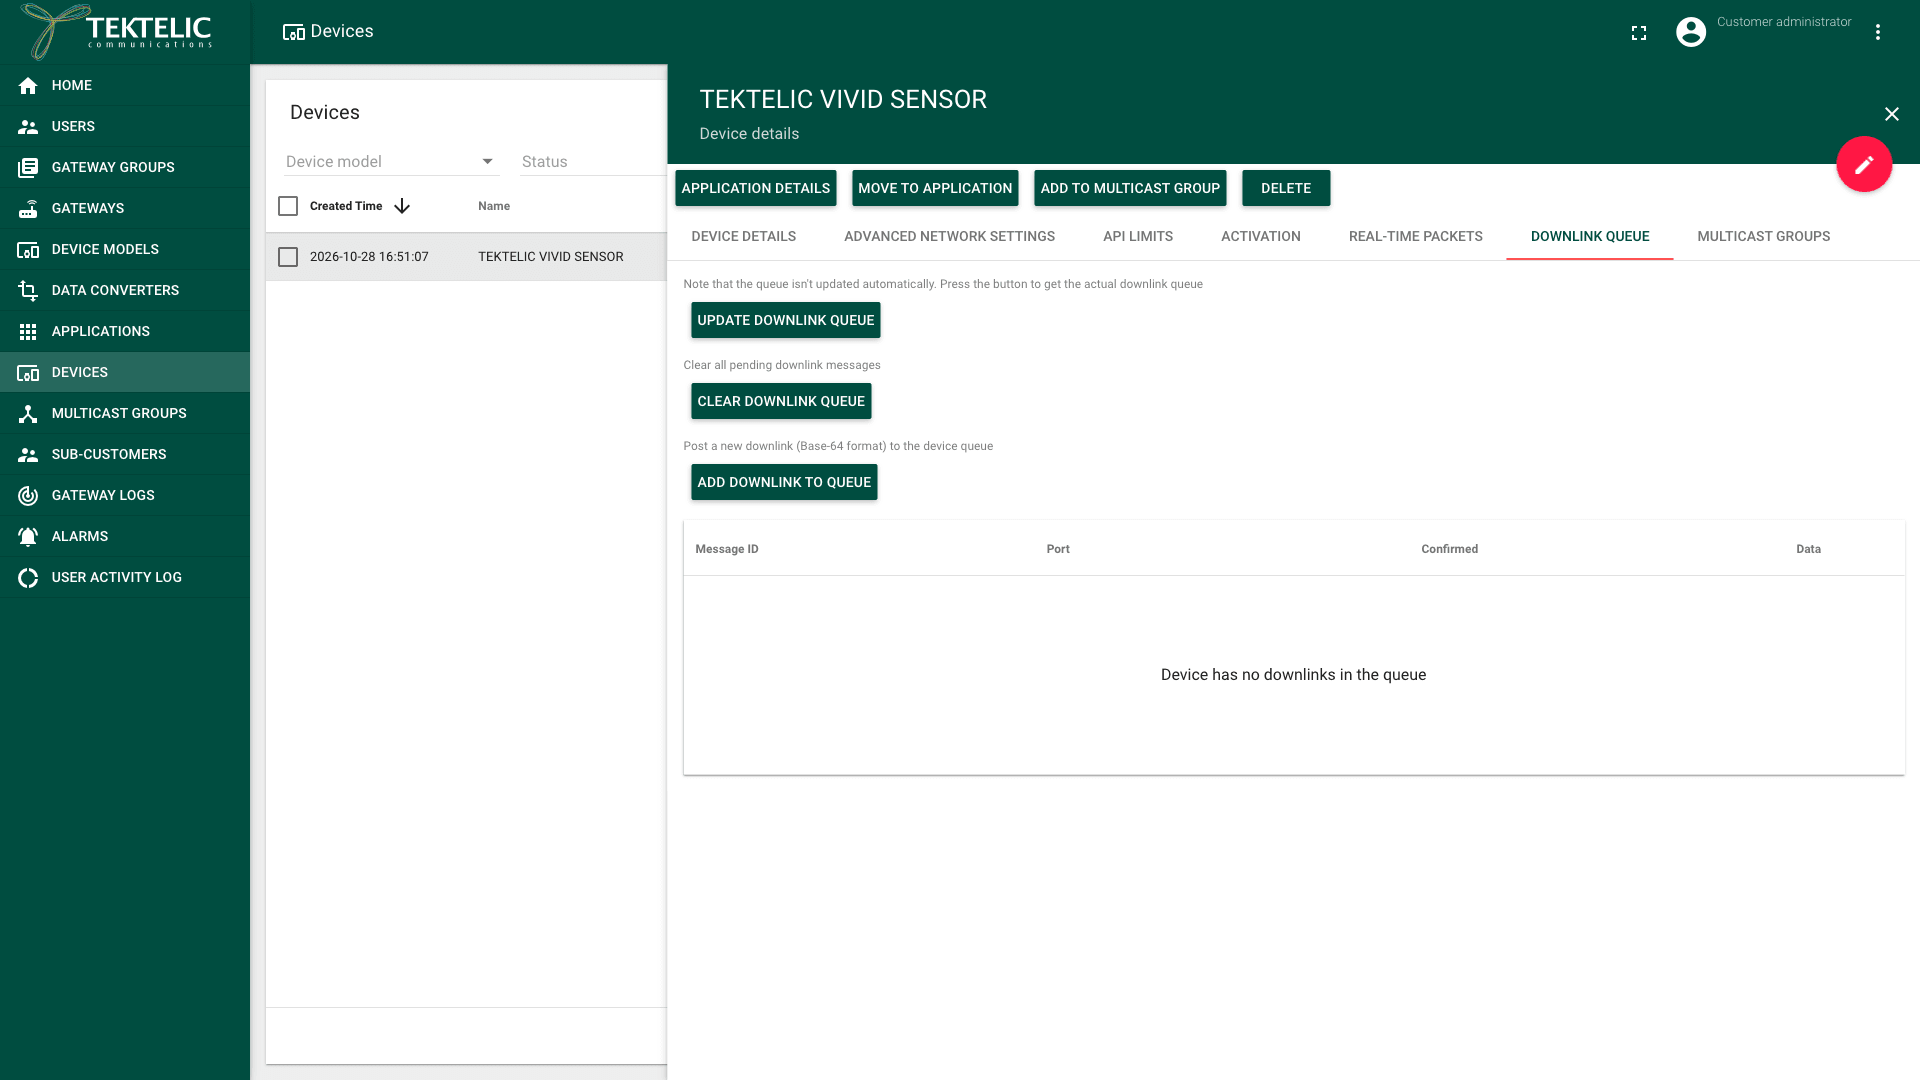
Select Clear downlink queue to remove every pending downlink. With Clear downlink queue upon join, in Advanced network settings, KONA Core also clears the queue when the device joins again. The tab doesn't refresh by itself: select Update downlink queue to see the current queue.
3. Receive windows. In LoRaWAN, a Class A device listens only for a short time after each uplink. It opens two receive windows:
- RX1 opens after the Receive window delay. You set the delay from 0 to 15 seconds, where 0 and 1 both mean 1 second. The RX1 data-rate offset sets the downlink data rate in RX1, relative to the uplink.
- RX2 opens one second after RX1, with the RX2 data-rate and RX2 frequency (MHz). The valid values depend on the frequency plan.
In Receive window, you choose whether KONA Core sends downlinks in RX1 or RX2 (one second after RX1). We recommend keeping the current values unless the device's documentation says otherwise. Next to each field, Currently used value shows the value KONA Core uses for the device now. For these settings at every level, see Network Settings.
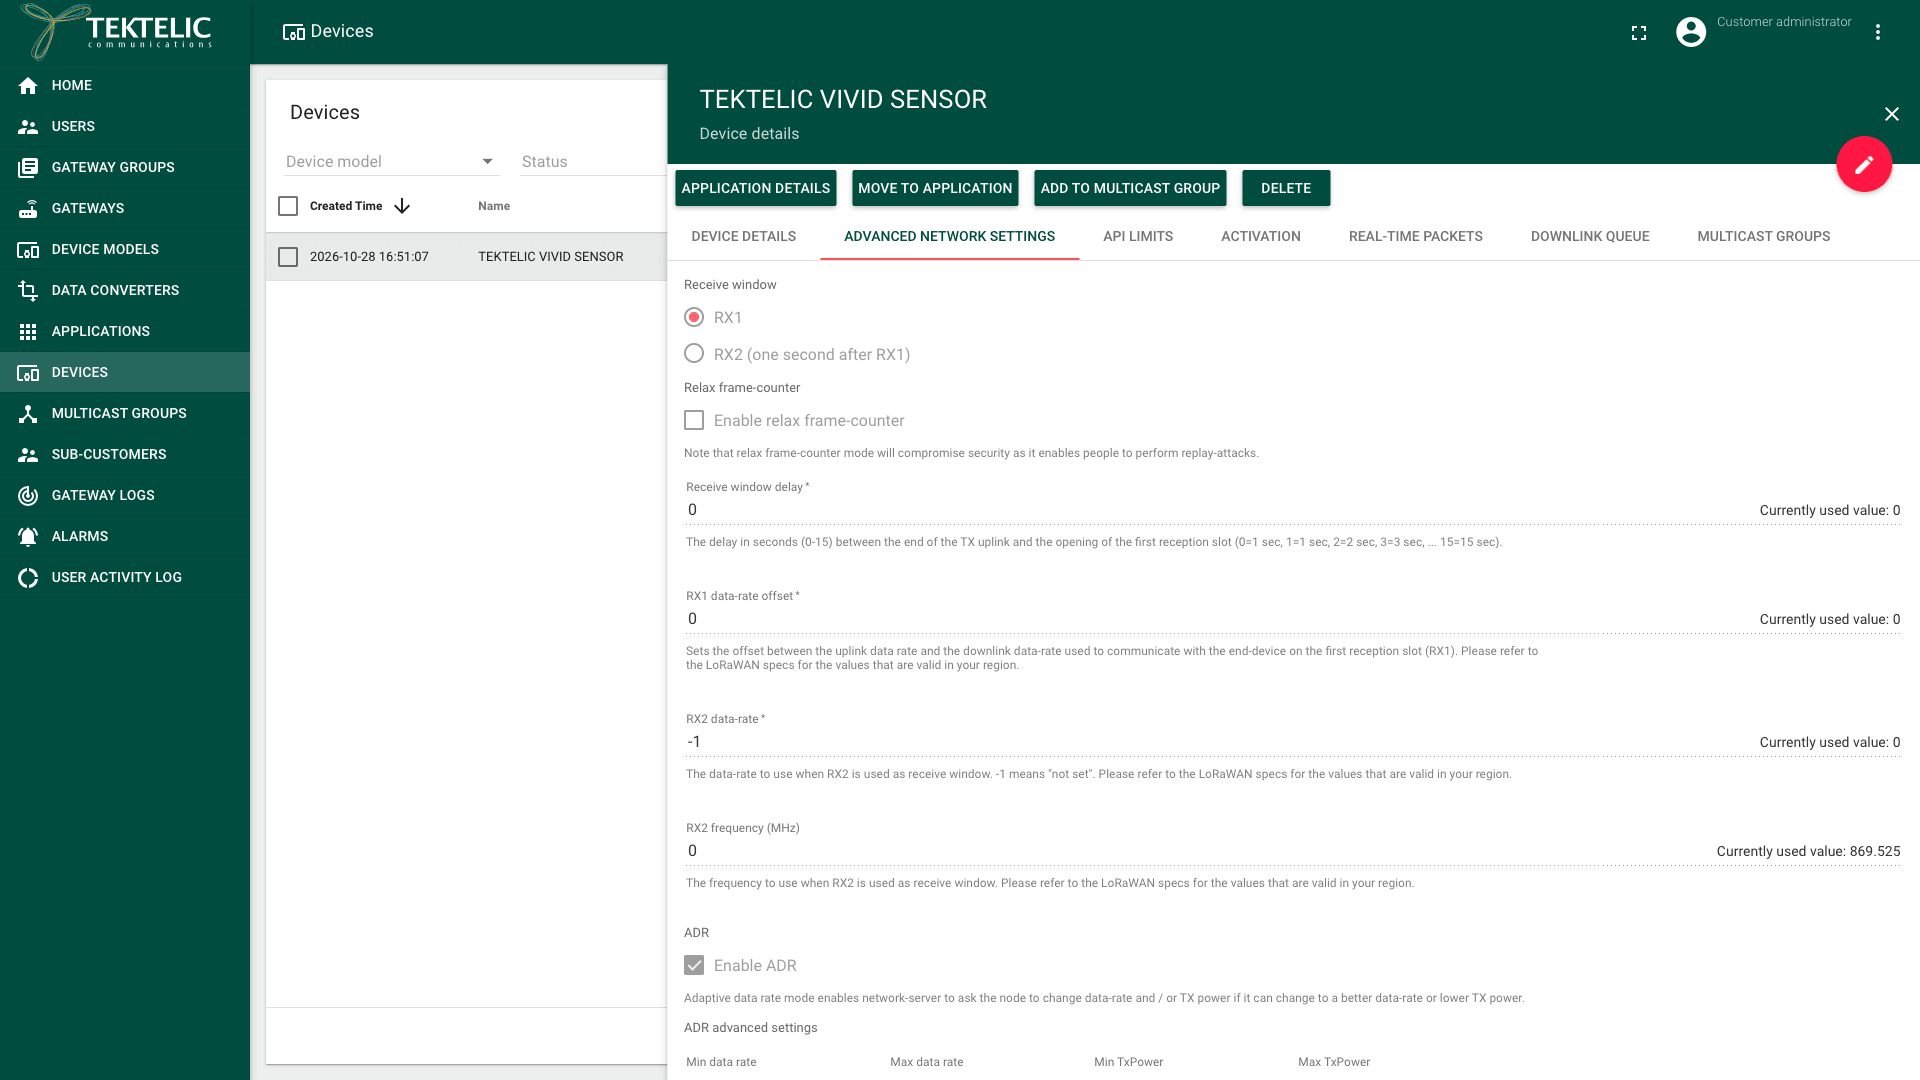
A Class B device also listens at scheduled ping slots. A Class C device listens all the time, except while it transmits. So KONA Core can send to Class B and Class C devices without waiting for an uplink. The device class shows in the Device class column on the Devices page.
4. Transmission. KONA Core selects a receiving gateway with the best signal to transmit the downlink. For MQTT, Online tracks keep-alive pings; for UDP, it tracks statistics reports. See Monitor Gateways.
5. Delivery confirmation. An unconfirmed downlink gets no answer from the device, so KONA Core can't know that the device received it. In LoRaWAN, the device acknowledges a confirmed downlink in its next uplink. We recommend confirmed downlinks for commands that must arrive, such as a configuration change. Use unconfirmed downlinks for frequent or noncritical data: each acknowledgment costs the device an uplink.
Uplink metadata includes ackBit, which indicates whether the device set the ACK bit in that uplink. See Message Formats. If the acknowledgment doesn't arrive, KONA Core automatically retries the payload. LoRaWAN 1.0.4 doesn't allow a downlink frame to be retransmitted with the same frame counter. Sending the payload again requires a new frame. See section 4.3.1.3 of the LoRaWAN L2 specification.
The UI has no separate indicator for the received acknowledgment. C/U in Real-time packets shows whether the message is confirmed or unconfirmed, not whether delivery was acknowledged.
Timings that look like delays but are normal
| What you see | Why it's normal | When to look closer |
|---|---|---|
| A downlink to a Class A device stays in the queue. | The device listens only after it sends an uplink. The downlink waits for the next uplink, which can take as long as the device's reporting interval. | The downlink is still queued after several uplinks. Check the events of the device. |
| Several queued downlinks arrive one by one. | In LoRaWAN, a Class A device gets at most one downlink per uplink. A queue of 3 downlinks needs at least 3 uplinks. | The queue doesn't shrink while the device sends uplinks. |
| The Downlink queue tab still lists a sent downlink. | The tab doesn't refresh by itself. | It's still listed after you select Update downlink queue. |
| A confirmed downlink isn't acknowledged at once. | The acknowledgment comes in the device's next uplink. | No acknowledgment after the next uplinks. |
| Data reaches your system minutes or hours late. | Your system didn't accept an earlier delivery, so the integration retries by its Retry scheme. | Check the integration's statistics. See Integration Monitoring. |
| A new device sends no data right after power-on. | The device first joins, then sends its first uplink. | The device stays Offline. See Device Activity & Status. |
To see the downlink queue from your own system, use Get downlink queue.
Related
- Architecture Overview
- Message Formats
- Send Downlinks
- Device Activation & Classes
- Network Settings
- Device Session & Frame Counters
- Payload Converters Overview
- Integration Monitoring
- Events & Alarms
- Alarms & Events Reference
- Glossary
- API Reference: Add downlink to queue, Get downlink queue and Flush downlink queue.