HTTP Integration
Overview
Send the data of your LoRaWAN® devices from TEKTELIC KONA Core Network Server to your own web service. You add an HTTP_V2 integration to an application. KONA Core then sends an HTTP request to your endpoint for each uplink, and tries again later when your endpoint doesn't accept it. Your system can also send downlinks back through the same integration.
This guide covers HTTP_V2. Use it when your system is a web service that already accepts HTTPS requests. When you have no preference, we recommend MQTT_BROKER: you host nothing and open no inbound port. Use MQTT_V2 when you already run an MQTT broker. To compare the types, see Integrations Overview. For the legacy HTTP type, see HTTP V1 Integration.
Before you start
- Role: Customer administrator or Sub-Customer administrator to add or change an integration. A Customer user or Sub-Customer user opens the integration read-only. A Provider has no access to integrations. See Users, Roles & Permissions.
- Application: the application with the devices whose data you want. See Manage Applications.
- Data converter: a Custom v2 data converter. An HTTP_V2 integration offers only v2 converters. For a TEKTELIC device, start from the TEKTELIC Device Converters Library. To decode in your own system instead, use a Pass-Through Converter.
- Endpoint: an HTTP or HTTPS endpoint on your server that KONA Core can reach from the internet.
- Credentials: if your endpoint requires them, a username and password for basic authentication, or a token for a request header.
Steps
Add the integration
-
In the side menu, select Applications.
-
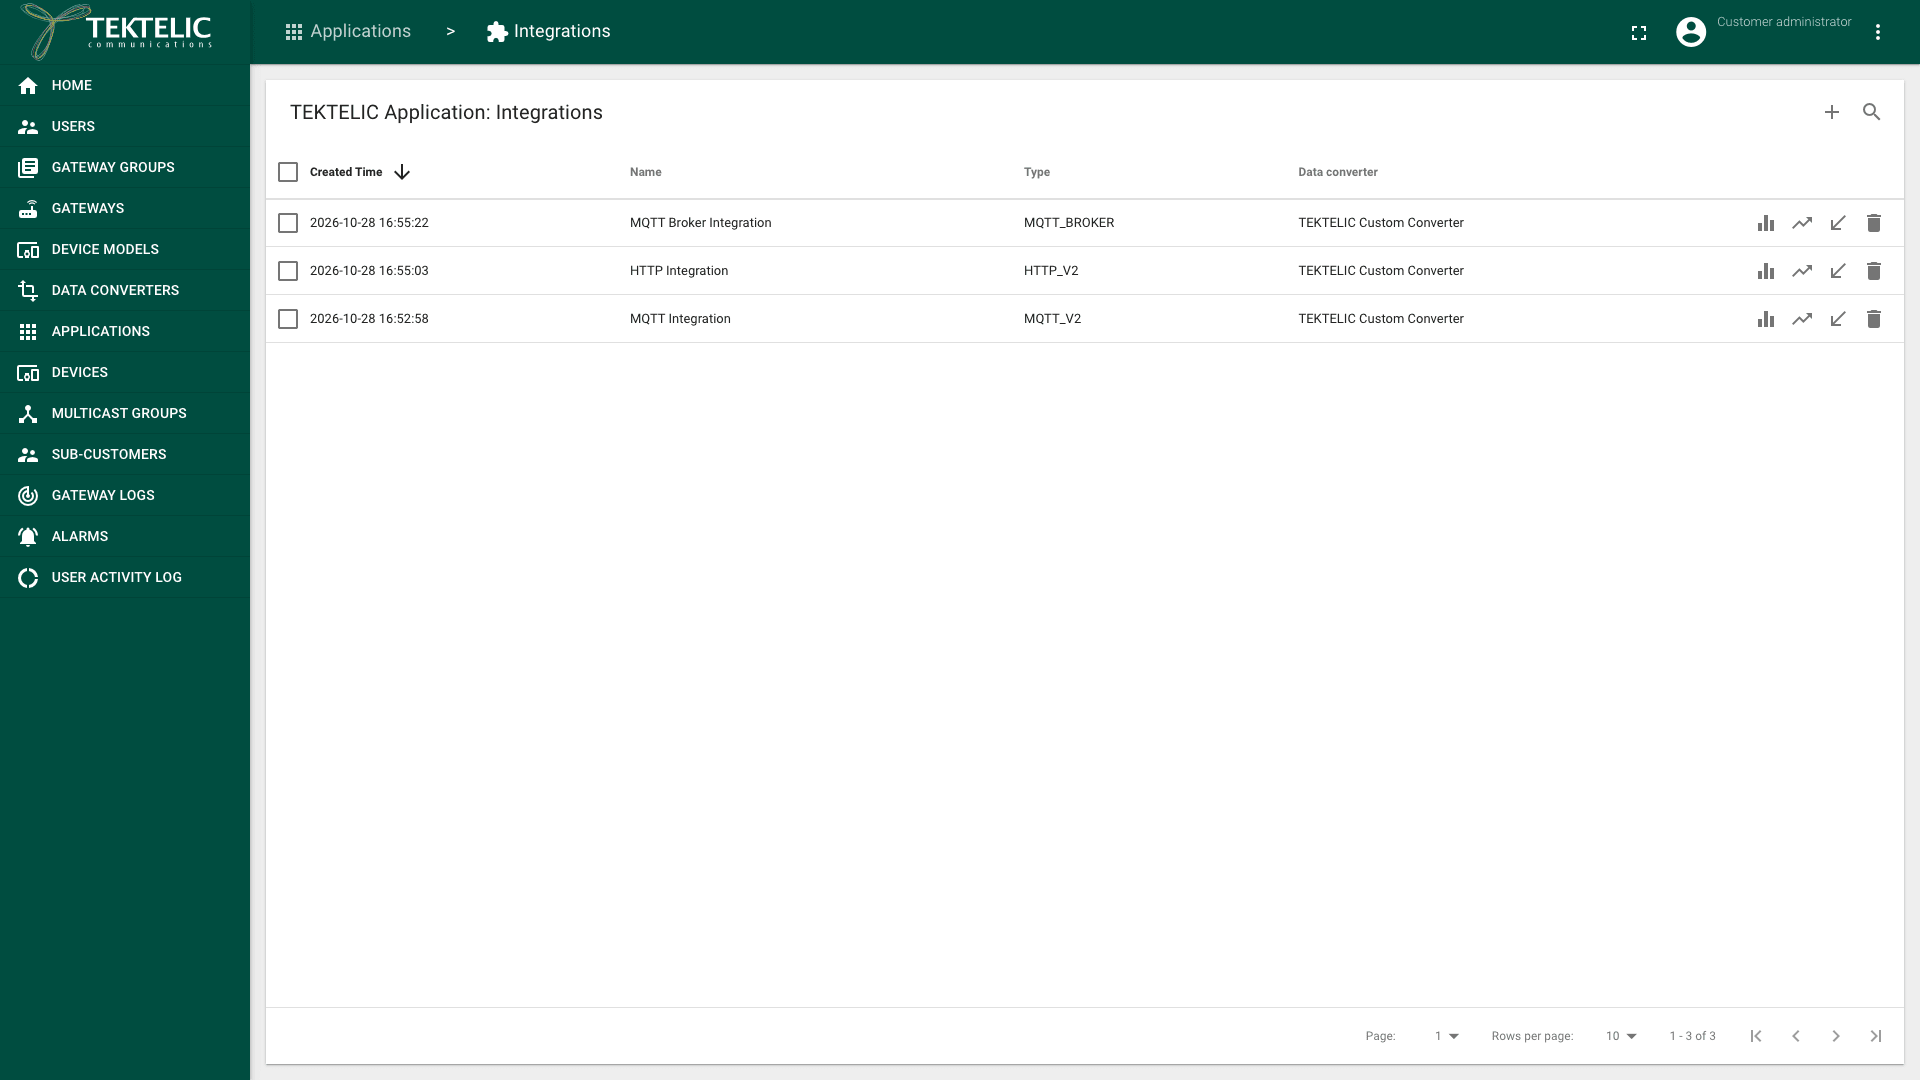
In your application's row, select Manage integrations (the puzzle piece icon). The application's integrations page opens, titled with the application name and Integrations.
-
Select Add Integration (the + icon). The Add Integration dialog opens.
-
Enter a Name. Use a name that says where the data goes, for example the name of your system and its environment.
-
In Type, select HTTP_V2. The dialog shows the HTTP fields, with Port set to
8080and Base path set to/. -
In Data converter, start typing the converter name, and select it in the list. Only Custom v2 converters appear.
HTTP URL path shows
/api/v2/integration/http/. It's read-only. When you save the integration, KONA Core adds a routing key to this path. Your system uses this path to send downlinks: see Send downlinks through the integration.
Set the endpoint address
KONA Core builds the request address from 4 fields. Enable HTTPS sets https:// or http://. Then follow Application address (IP or name without http or https prefix), Port and Base path.
-
In Application address (IP or name without http or https prefix), enter the domain name or IP address of your server, without
https://. For example,app.example.com. -
In Port, enter the port of your endpoint, from 0 to 65535. For HTTPS, this is usually
443. -
In Base path, enter the path of your endpoint on that server, starting with
/. For example,/kona/uplinks. -
Select Enable HTTPS. We recommend HTTPS for every endpoint on the internet: without it, the device data and your credentials travel unencrypted. Clear it only for a server in a private network.
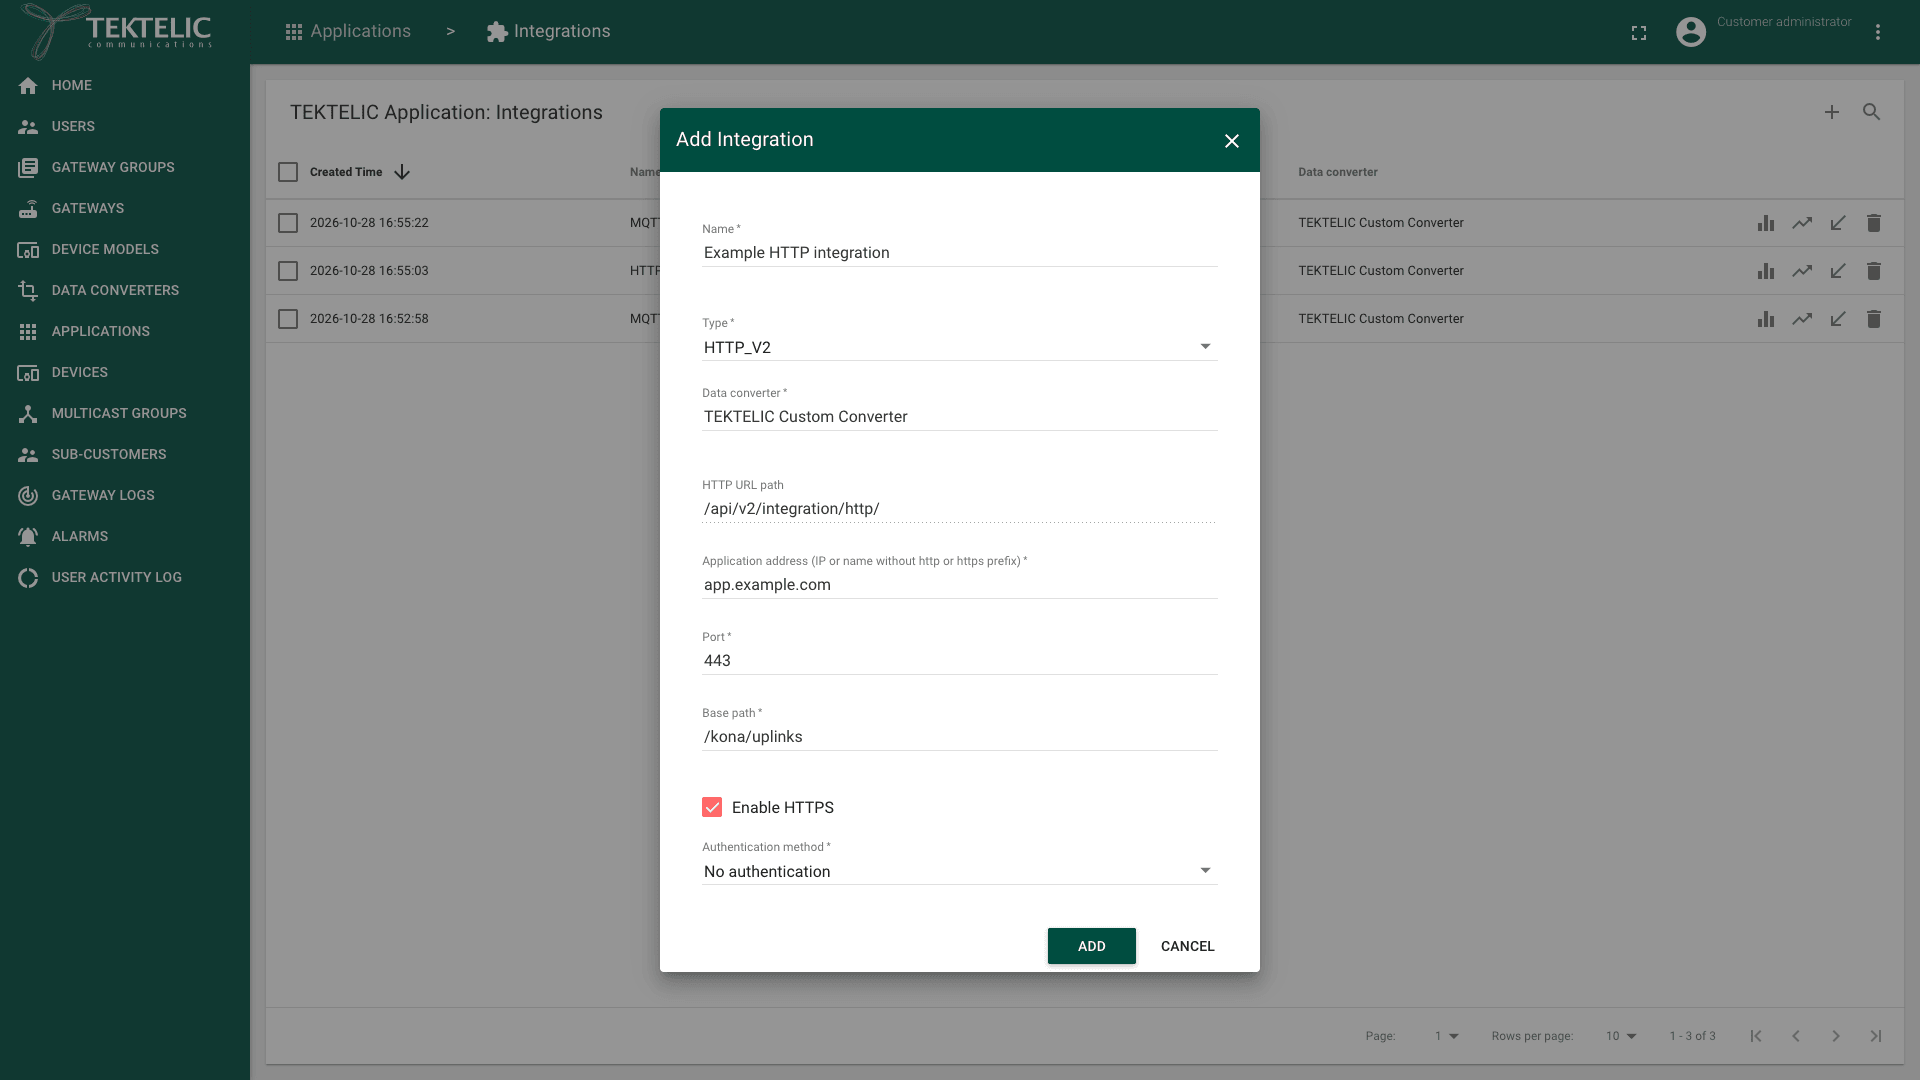
With the values above, KONA Core sends each uplink to https://app.example.com/kona/uplinks, on port 443. Each uplink is one request with a JSON body. The body holds the decoded values with metadata such as deviceEui and deviceName. For every field, see Message Formats. confirm the HTTP method (likely POST), the Content-Type header of the request, and which HTTP status codes KONA Core treats as a successful delivery.
Set authentication and headers
-
In Authentication method, select how KONA Core signs in to your endpoint:
- Basic authentication (recommended when your endpoint supports it): enter the Username and the Password. KONA Core sends them with each request.
- No authentication (the default): KONA Core sends no credentials. Use it only together with a token in Request headers, or for a server in a private network.
-
To add a header to every request, select Add under Request headers. A row with Key and Value appears.
-
Enter the header name in Key and its value in Value. For example,
AuthorizationandBearer <api-token>, if your endpoint expects a token. Select Add again for each further header. To remove a row, select the X icon next to it.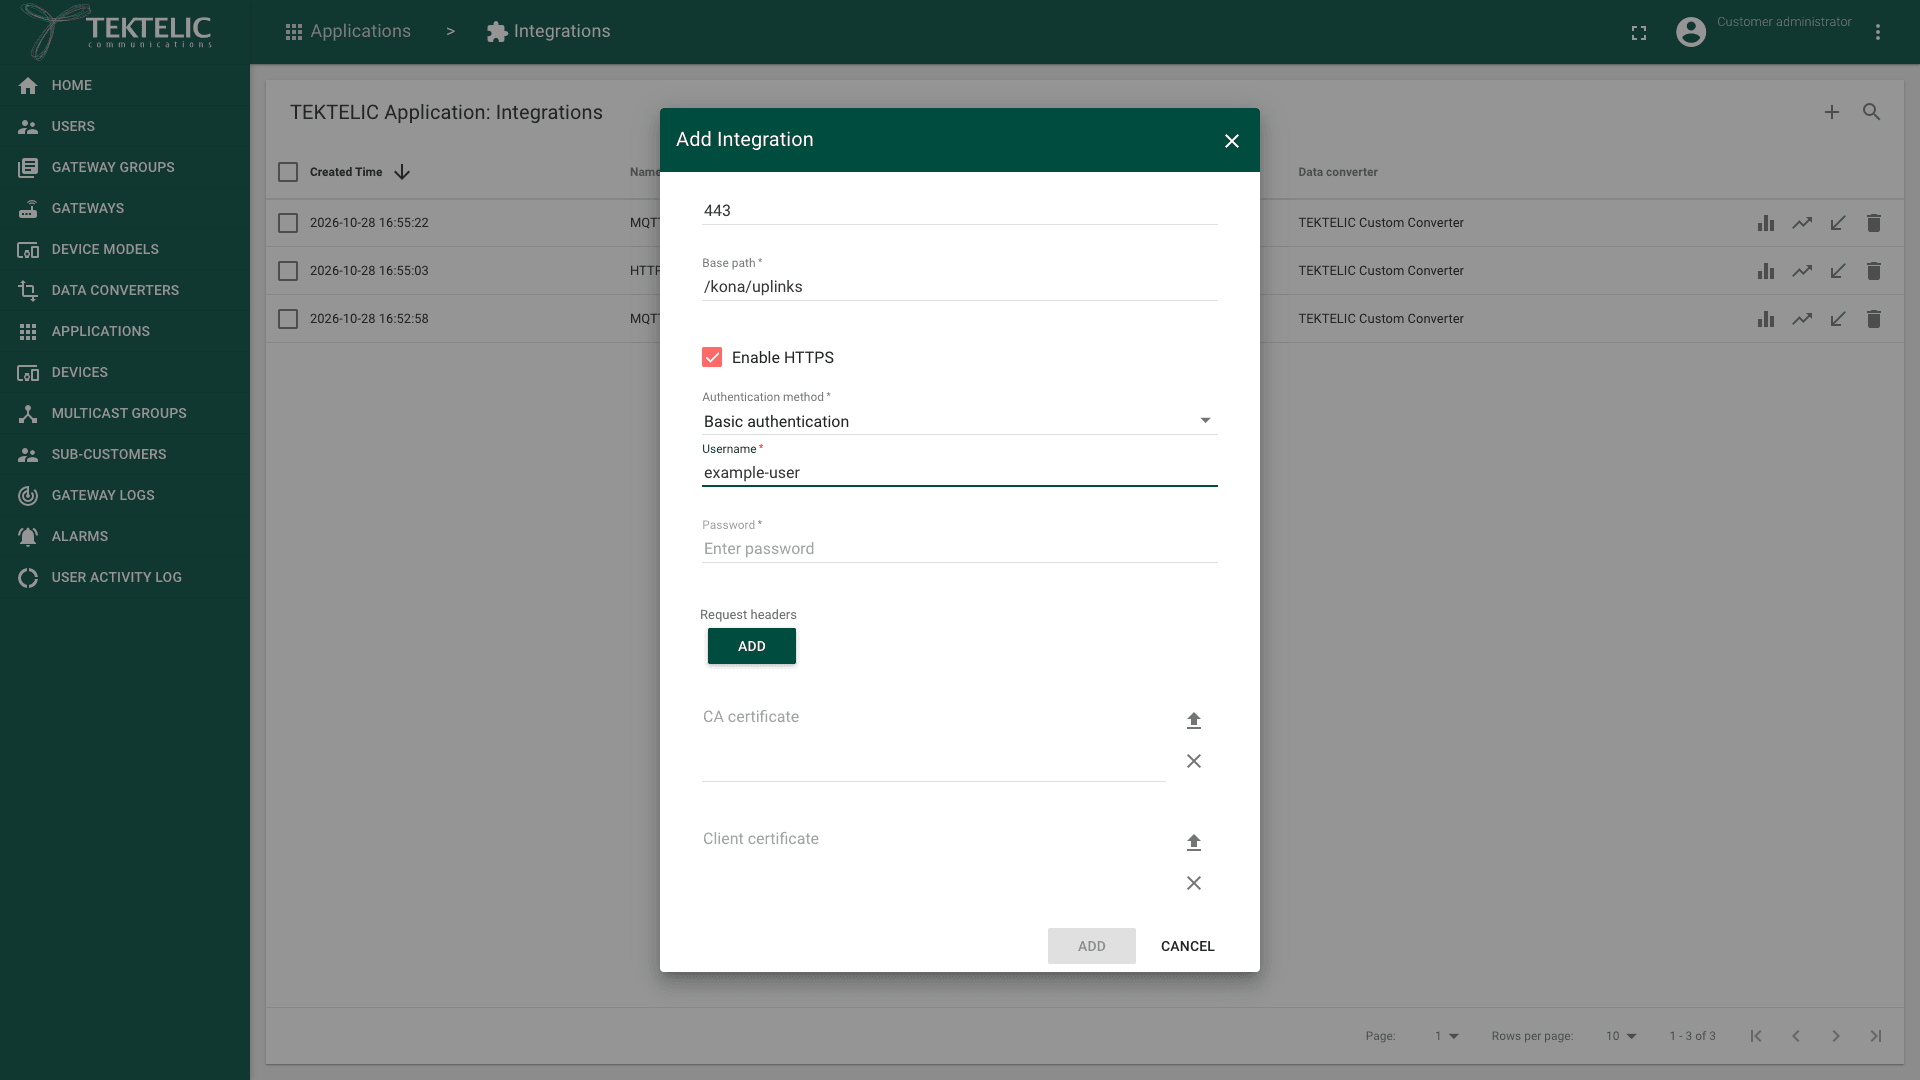
-
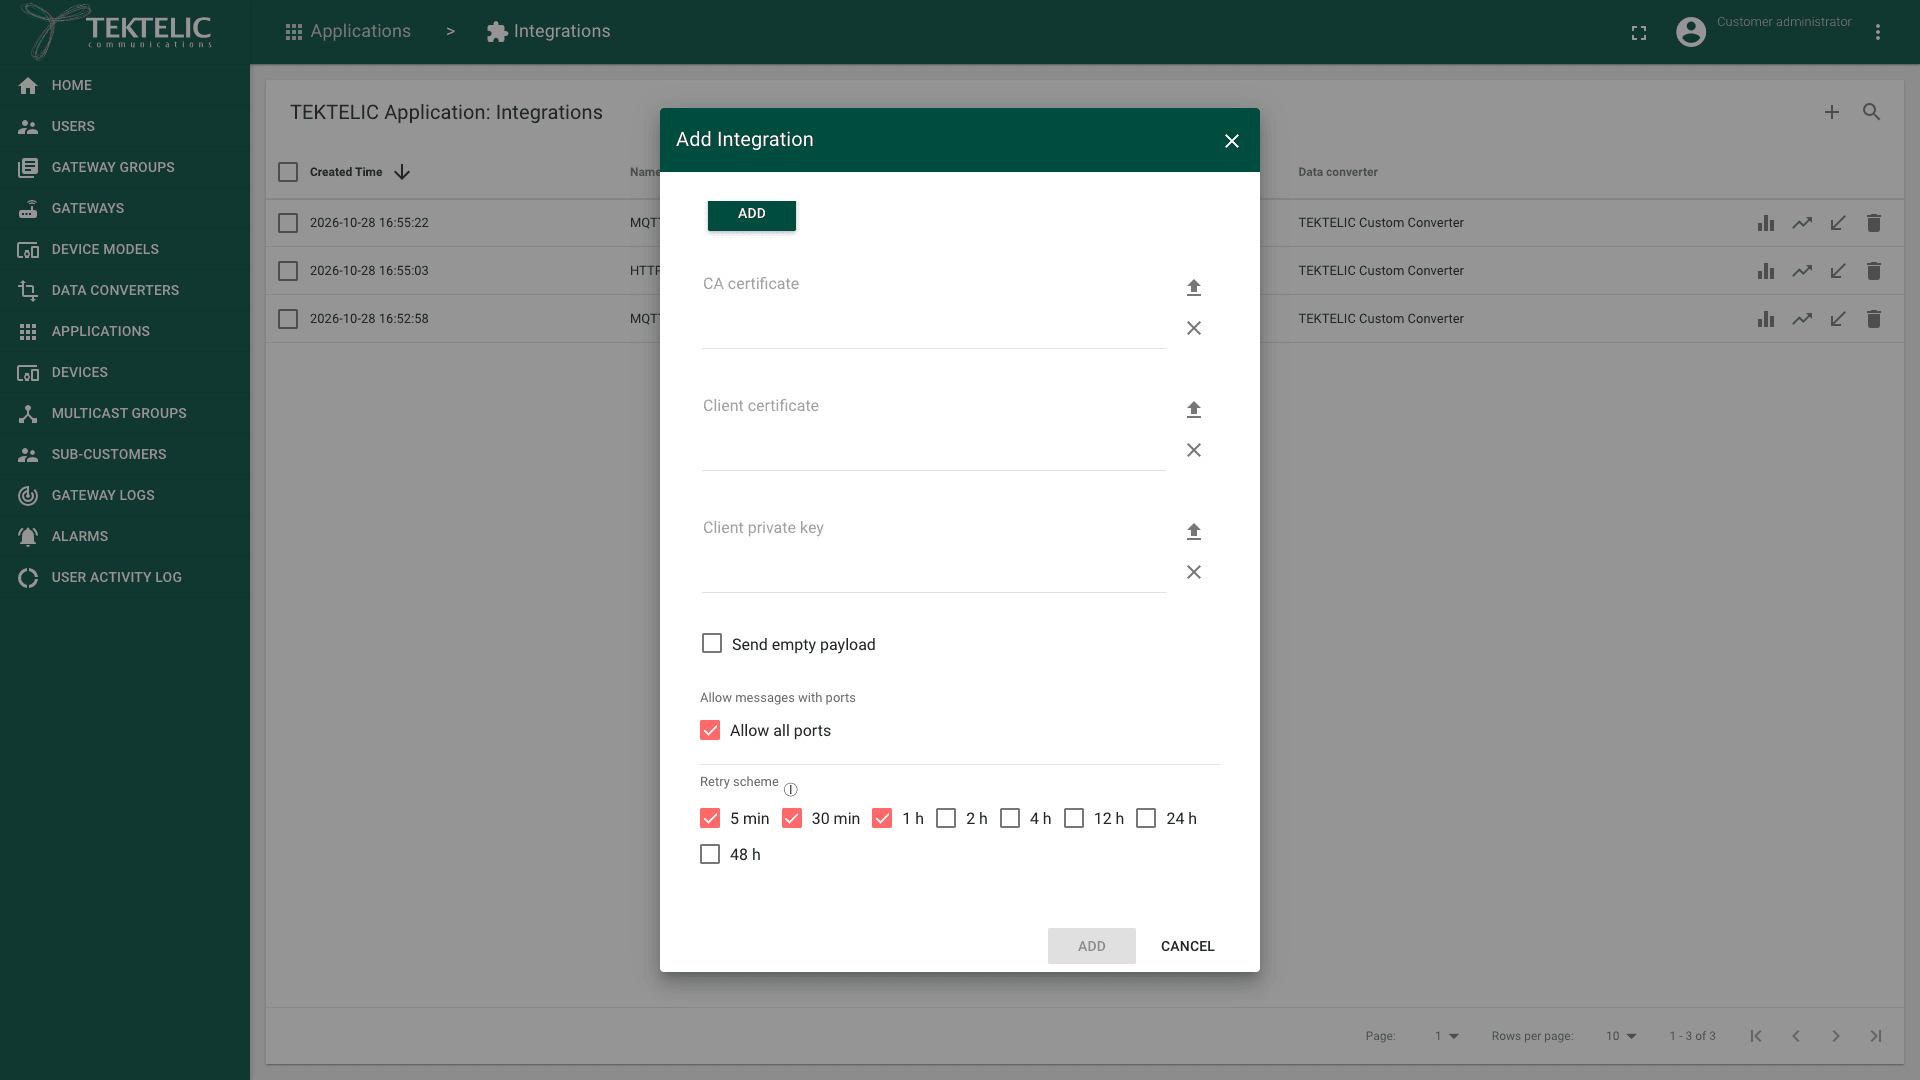
Fill in the certificate fields only when your server needs them. Paste the certificate text into the field, or select the upload icon (Upload certificate from file). The X icon clears the field (Clear certificate).
- CA certificate: the certificate of the authority that signed your server's certificate, if it isn't a public authority. confirm whether KONA Core trusts public certificate authorities when CA certificate is empty.
- Client certificate and Client private key: for an endpoint that requires KONA Core to present a client certificate (mutual TLS).
Treat the password, header values and private key as secrets. Don't share screenshots of them.
Set the filters and the retry scheme
-
Leave Send empty payload cleared, unless your system needs uplinks without data, for example to track that a device is alive. When it's selected, KONA Core also delivers uplinks that carry no payload.
-
Under Allow messages with ports, leave Allow all ports selected, so the integration gets every uplink of the application. To get only some ports, clear Allow all ports. Then enter each FPort, from 0 to 255, in Allow ports, and press Enter after each one.
-
Under Retry scheme, select the delays between delivery attempts. The options are 5 min, 30 min, 1 h, 2 h, 4 h, 12 h, 24 h and 48 h. A new integration starts with 5 min, 30 min and 1 h. We recommend this default. Add 24 h or 48 h if your endpoint can be down for longer, for example during maintenance.
-
Select Add. The dialog closes, and the integration appears on the integrations page with the type HTTP_V2 and its Data converter. If Add stays unavailable, a required field is empty or not valid. The field shows the error, for example or
-
Select the new integration's row. The details panel opens. HTTP URL path now ends with the routing key of the integration.
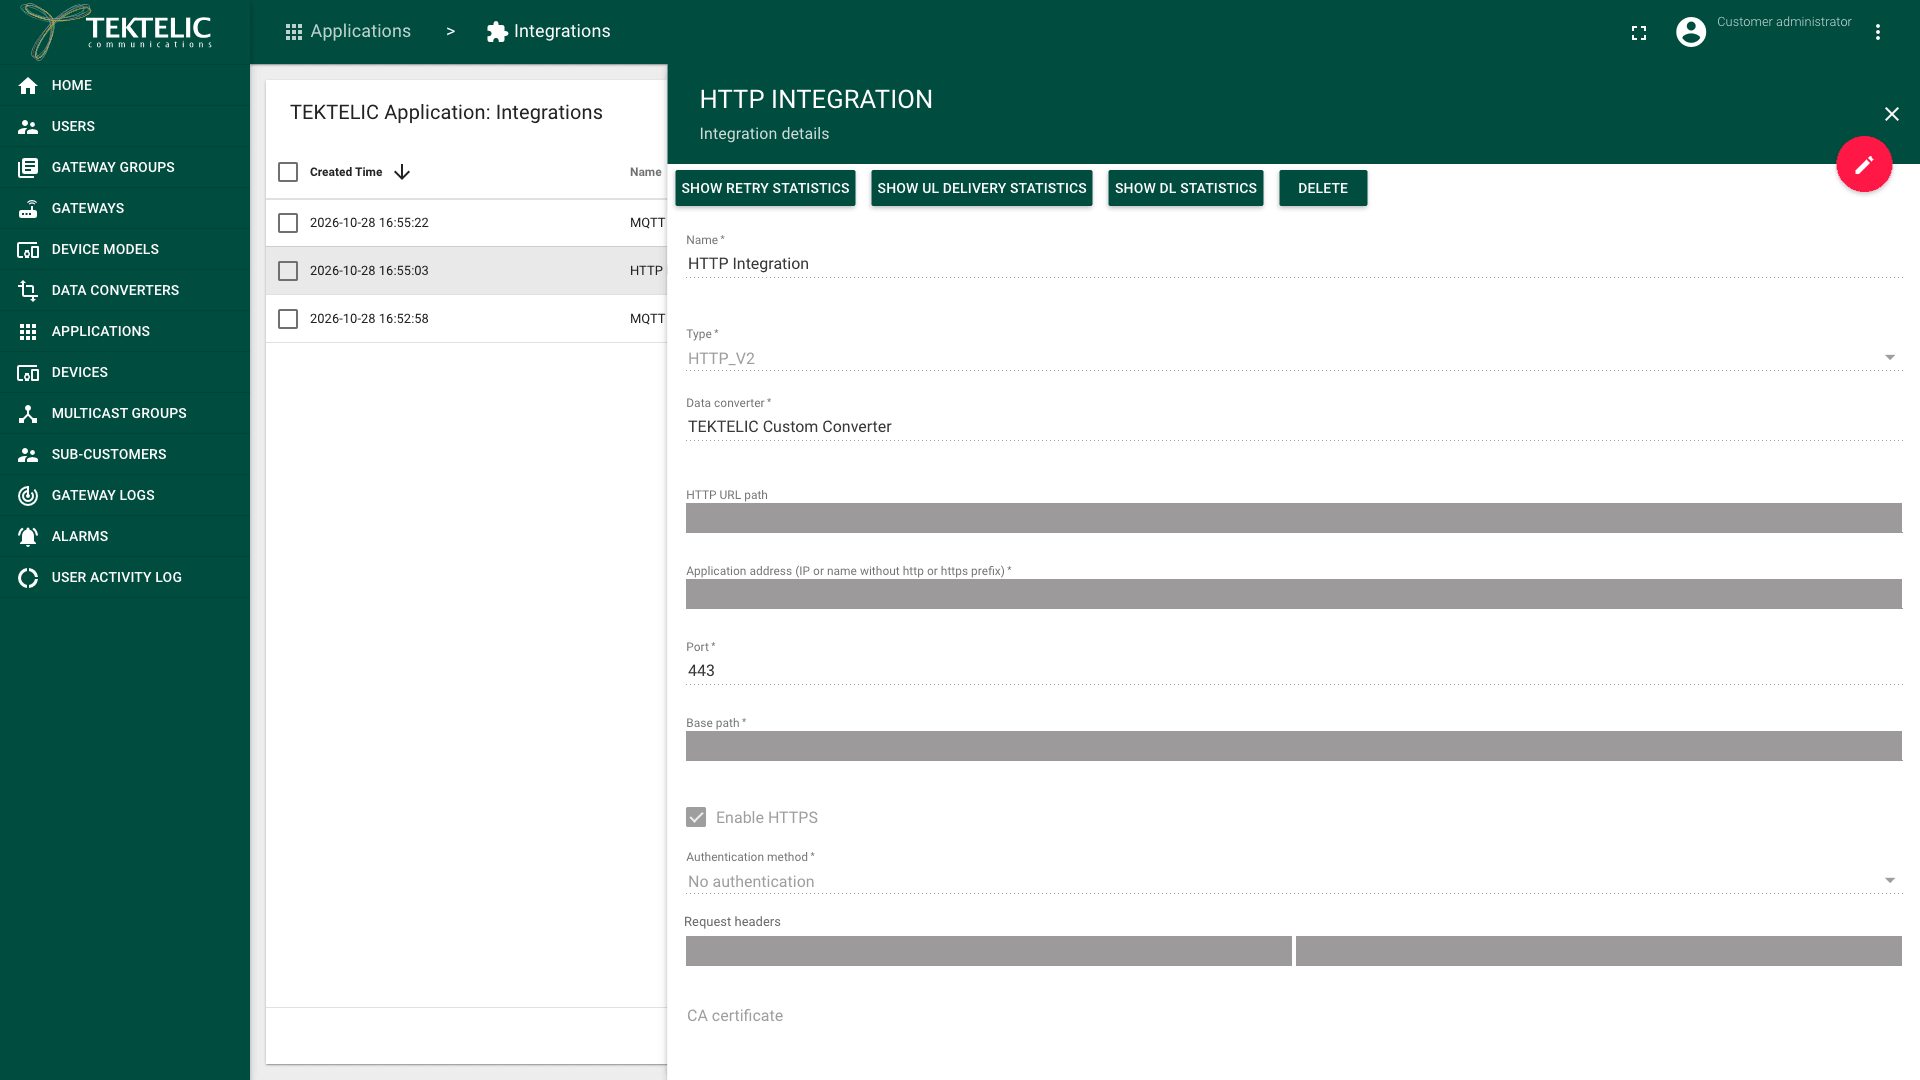
To change the integration later, select it in the list and select Toggle edit mode (the pencil icon). Change the fields, then select Apply changes (the check mark icon).
What happens when your endpoint fails
When a request fails, KONA Core keeps the uplink and tries again according to the Retry scheme. Each delay starts from the previous attempt. With the default scheme, retries follow after 5 minutes, then 30 minutes, then 1 hour.
While the endpoint fails, you see:
- An alarm. KONA Core raises the event
INTEGRATION_DISCONNECTED, of the type Offline and the severity Critical. Its description gives the cause and the request address. For example, withCause: [404 NOT_FOUND], or when the server doesn't answer. It also includes the payload of the uplink that failed. - Retries. Show retry statistics lists the uplinks waiting for their next attempt, by Initial retry delay (min).
When your endpoint accepts a request again, the alarm clears. KONA Core records INTEGRATION_FIRST_UL, with the description If the last retry fails, KONA Core drops the uplink and increases Dropped by one in the UL delivery statistics.
Changing the Retry scheme doesn't cancel retries that are already scheduled, as the hint next to the field says. To get notified when an integration fails, add the trigger Integration is disconnected to an alarm rule: see Configure Application Alarm Rules.
Send downlinks through the integration
Your system sends a downlink to a device as an HTTP request to KONA Core. The integration's data converter runs its encoder on your data, and KONA Core puts the result in the device's downlink queue.
- Open the integration's details panel and copy the HTTP URL path. It has the form
/api/v2/integration/http/<routing key>. - From your system, send a
POSTrequest to that path on the KONA Core server of your region, for examplehttps://<KONA Core host>/api/v2/integration/http/<routing key>. - Send a JSON body with the DevEUI of the device in
deviceEui, your data indata, andconfirmedset totruefor a confirmed downlink. For all fields and an example, see Message Formats.
Keep the routing key secret: it identifies the integration. The downlink waits in the queue until the device can receive it. For the timing, see Send Downlinks. In the API Reference, the request is Process downlink v2.
Check the result
Test the integration with a device that sends uplinks, such as a TEKTELIC sensor in the application.
- Wait for the device's next uplink. To see when it arrives, open the device's Real-time packets tab. See Device Activity & Status.
- Check your server's log. It shows a request to your Base path, with a JSON body that holds the device's
deviceEuiand its decoded values. - In the side menu, select Alarms, and clear Raised only. The integration has an
INTEGRATION_FIRST_ULrecord and no raisedINTEGRATION_DISCONNECTEDalarm. Only users with access to the integration can see these records. - On the integrations page, select Show UL delivery statistics (the trend icon) in the integration's row. The Delivered count grows with each uplink. Show retry statistics shows while every request succeeds.
- To test downlinks, send one downlink as in Send downlinks through the integration. The device's Downlink queue tab lists it until the device receives it. Show DL statistics counts it as DL Received.
For the statistics in detail, see Integration Monitoring.
Troubleshooting
| Symptom | Likely cause | What to do |
|---|---|---|
INTEGRATION_DISCONNECTED with and an HTTP status such as 404 NOT_FOUND | Your server answers, but not at this path, or it rejects the request. A 404 usually means a wrong Base path. A 401 or 403 usually means wrong credentials or headers. | Compare the request address in the alarm description with your endpoint. Fix Base path, Authentication method or Request headers. |
INTEGRATION_DISCONNECTED with | KONA Core can't reach your server, or the connection closes before an answer. Common causes: a wrong address or port, a firewall, or Enable HTTPS set for an HTTP-only server (or the reverse). | Check Application address (IP or name without http or https prefix) and Port. Check that your server accepts connections from the internet on that port, with the protocol set in Enable HTTPS. |
Your server gets requests, but without the decoded values, or KONA Core records INTEGRATION_UL_DECODING_FAILURE | The data converter doesn't fit the device's payload. | Check the converter's statistics and code. See Integration Monitoring and Write a Decoder. |
Still stuck? A Sub-Customer contacts their Customer, a Customer contacts their Provider, and a Provider contacts TEKTELIC Support. Send the application and integration names, the DevEUI of a device, the time in UTC, the alarm description, and a screenshot of Show retry statistics. Remove passwords, tokens and routing keys from what you send.