MQTT Integration
Overview
Publish the data of your LoRaWAN® devices from TEKTELIC KONA Core Network Server to your own MQTT broker. You add an MQTT_V2 integration to an application. KONA Core then connects to your broker and publishes each decoded uplink to your Push Topic.
This guide covers MQTT_V2. If you don't run an MQTT broker, use MQTT Broker Integration instead. For the legacy MQTT type, see MQTT V1 Integration.
MQTT_V2 or MQTT_BROKER
Both types deliver the same data over MQTT. They differ in who runs the broker and who connects to whom.
| MQTT_V2 (this guide) | MQTT_BROKER | |
|---|---|---|
| Broker | Your broker. | The KONA Core broker. |
| Who connects | KONA Core connects to your broker as a client. | Your MQTT client connects to the KONA Core broker. |
| Credentials and topics | You enter them in the form. | KONA Core creates them when you save the integration. You can't change them. |
| TLS | Enable TLS, with optional CA certificate, Client certificate and Client private key. | Your client connects to the MQTTS Port (TLS). |
| Retry scheme | In the form. | Not in the form. |
We recommend MQTT_BROKER when you have no preference: you host nothing and open no inbound port. Use MQTT_V2 when you already run an MQTT broker that your applications subscribe to. Use HTTP_V2 when your system is a web service that already accepts HTTPS requests. For all integration types, see Integrations Overview.
Before you start
- Role: Customer administrator or Sub-Customer administrator. The user roles open integrations read-only. See Users, Roles & Permissions.
- Application: an application with your devices. See Manage Applications.
- Data converter: a v2 data converter for your devices. An MQTT_V2 integration lists only v2 data converters. For TEKTELIC devices, see TEKTELIC Device Converters Library. To write one, see Write a Decoder.
- MQTT broker: reachable from the internet at an IP address or domain name, with a port open to KONA Core. confirm which MQTT protocol versions KONA Core uses to connect.
- Broker account: a username and password for KONA Core, if your broker requires them. The account must be allowed to publish to the Push Topic and to subscribe to the Pull Topic.
- Certificates, for TLS: the CA certificate of your broker, if a private CA signed it. For client certificate authentication, also a client certificate and its private key.
- Subscription plan: room for 1 more integration. See Subscription Plans & Limits.
Steps
Add the integration
- In the side menu, select Applications.
- In your application's row, select the Manage integrations icon. You can also select the application and then Manage integrations in its details panel. The application's integrations page opens, titled with the application name and Integrations.
- Select Add Integration (the + icon). The Add Integration dialog opens.
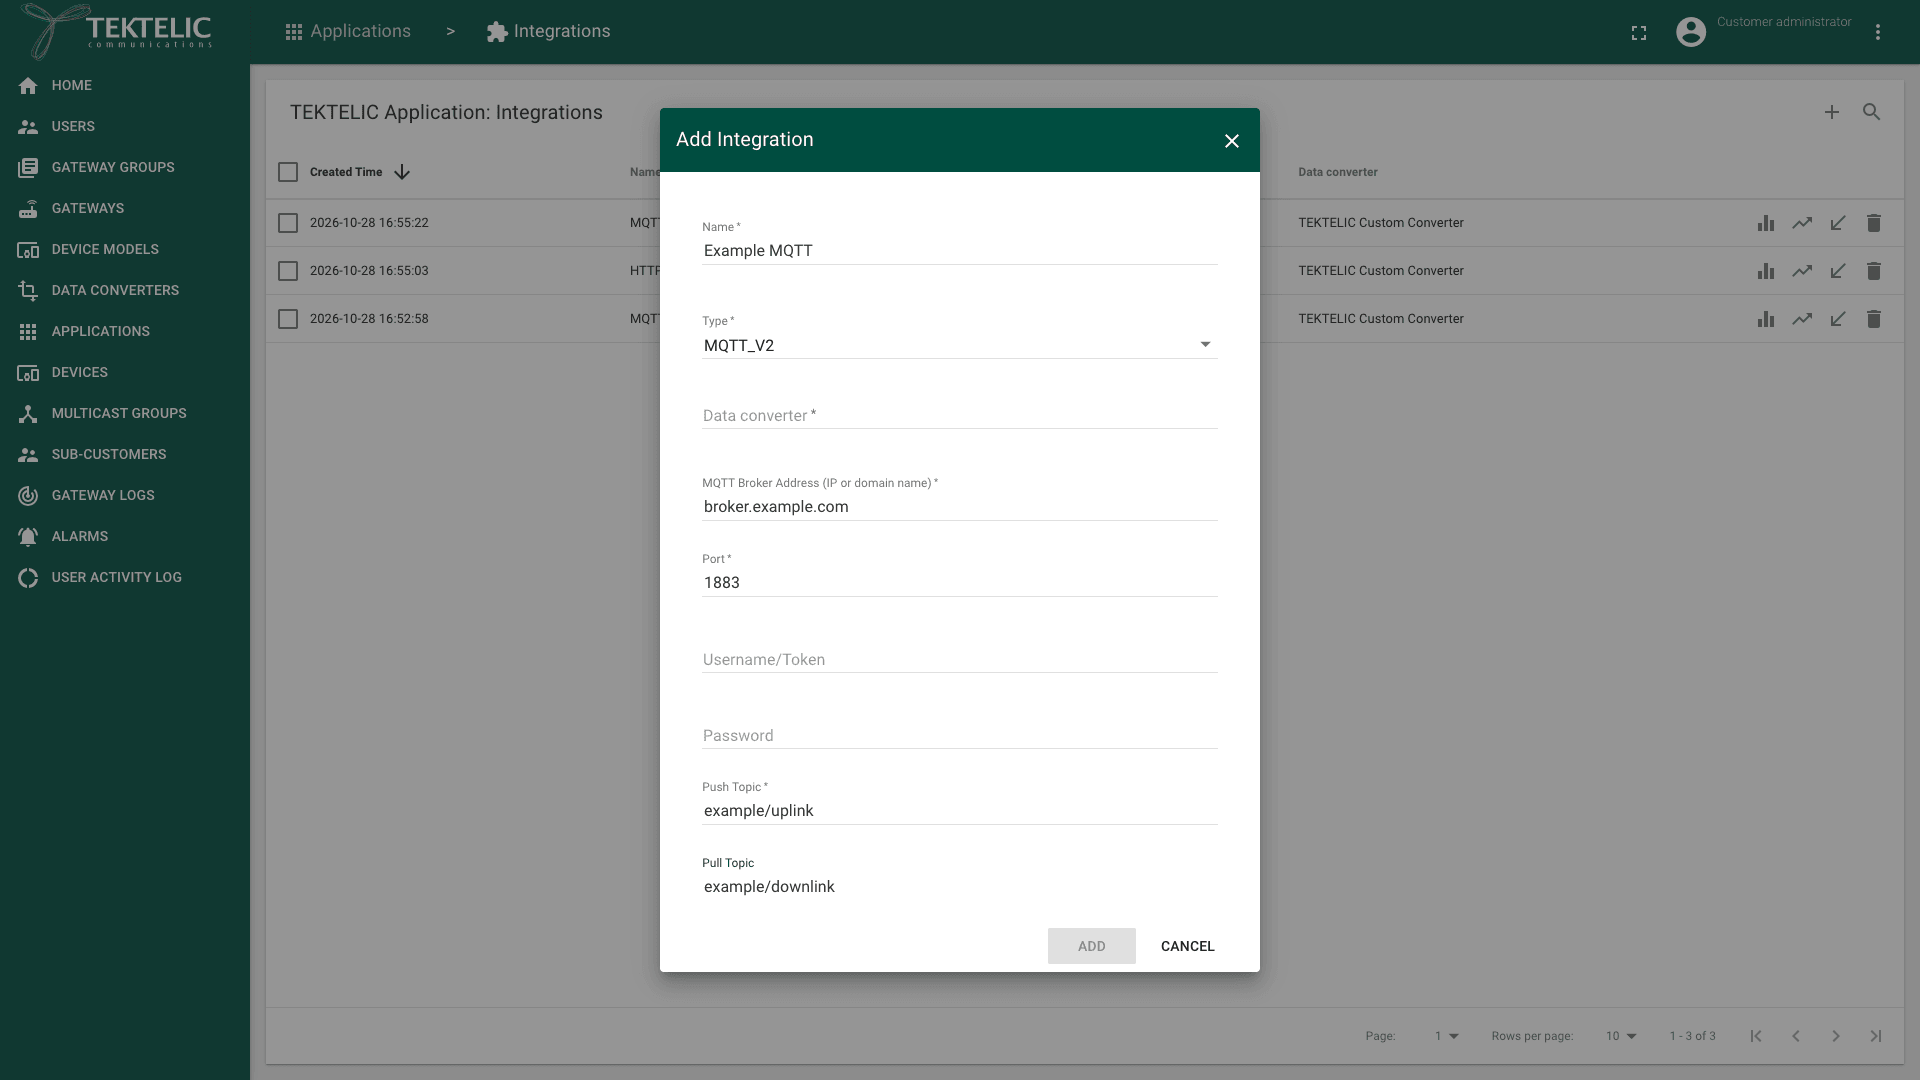
- Enter a Name. The name is required.
- In Type, select MQTT_V2. The MQTT connection fields appear.
- Select the Data converter for your devices. Only v2 data converters are listed.
Enter the connection settings
-
Enter the MQTT Broker Address (IP or domain name) of your broker. Enter the address without a protocol prefix.
-
Enter the Port of your broker. The default is
1883, and the field accepts0to65535. For TLS, enter your broker's TLS port, usually8883. -
If your broker requires a sign-in, enter the Username/Token and the Password of the broker account.
-
Enter the Push Topic. KONA Core publishes each uplink to this topic. The field is required. To use one topic per device, include
${deviceEUI}, for exampleuplinks/${deviceEUI}. Keep the placeholder's capitalization. -
To send downlinks from your system, enter the Pull Topic. KONA Core subscribes to this topic on your broker. Leave it empty if you don't send downlinks.
-
Select Enable TLS. It's cleared by default. We recommend TLS: it encrypts the data and the broker credentials on the way to your broker.
-
Enter a Client ID, unique on your broker. Most brokers disconnect a client when another client connects with the same ID. When the field is empty, KONA Core generates a client ID, such as
tekfollowed by digits.
Set the delivery options
Keep the defaults unless your broker needs other values.
| Field | Default | Range | What it does |
|---|---|---|---|
| pendingQueue max size | 1000 | 1 to 10000 | The number of messages the integration keeps while it can't deliver them. A full queue can result in lost messages. the legacy integration description says the oldest message is discarded, while its parameter table says new messages are dropped. |
| max inflight messages | 5 | 1 to 100 | The number of published messages that can wait for the broker's acknowledgment at the same time. |
| connection timeout (seconds) | 30 | 1 or more | How long KONA Core waits for the broker to accept the connection. |
| cleanSession | Cleared | The MQTT clean session flag. When it's cleared, the broker keeps the session of KONA Core between connections. | |
| keepAlive interval (seconds) | 60 | 1 or more | The MQTT keep-alive interval of the connection. |
| push retained | Cleared | Publishes uplinks as retained messages. | |
| push QoS | at-least-once | at-most-once, at-least-once | The MQTT quality of service of each published uplink. |
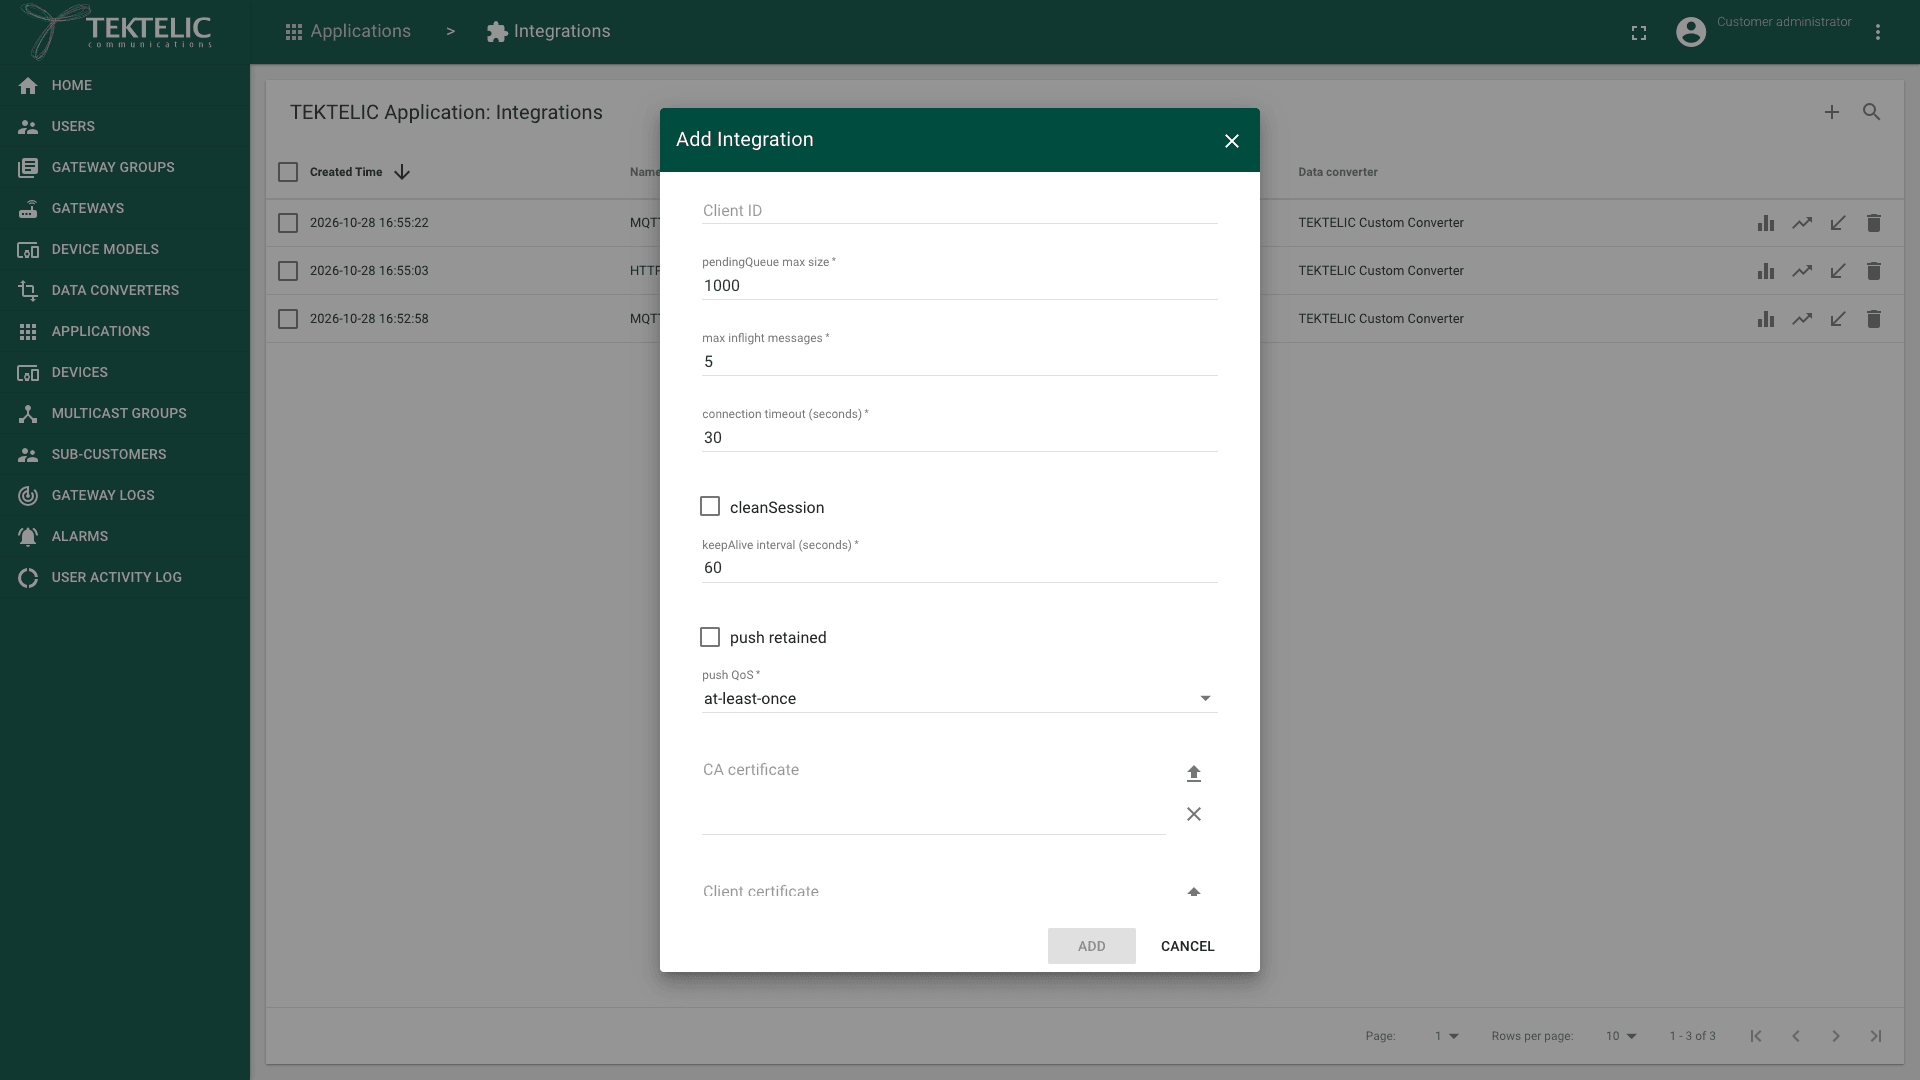
- Leave push QoS at at-least-once. The broker acknowledges each message, so a message lost on the way is sent again. Your system can get a message twice, so make it ignore duplicates.
- Leave push retained cleared. With a retained message, every new subscriber first gets the last uplink again.
Add certificates for TLS
Skip this part if you don't use TLS, or if a public CA signed your broker's certificate. confirm whether KONA Core trusts public CAs when CA certificate is empty.
-
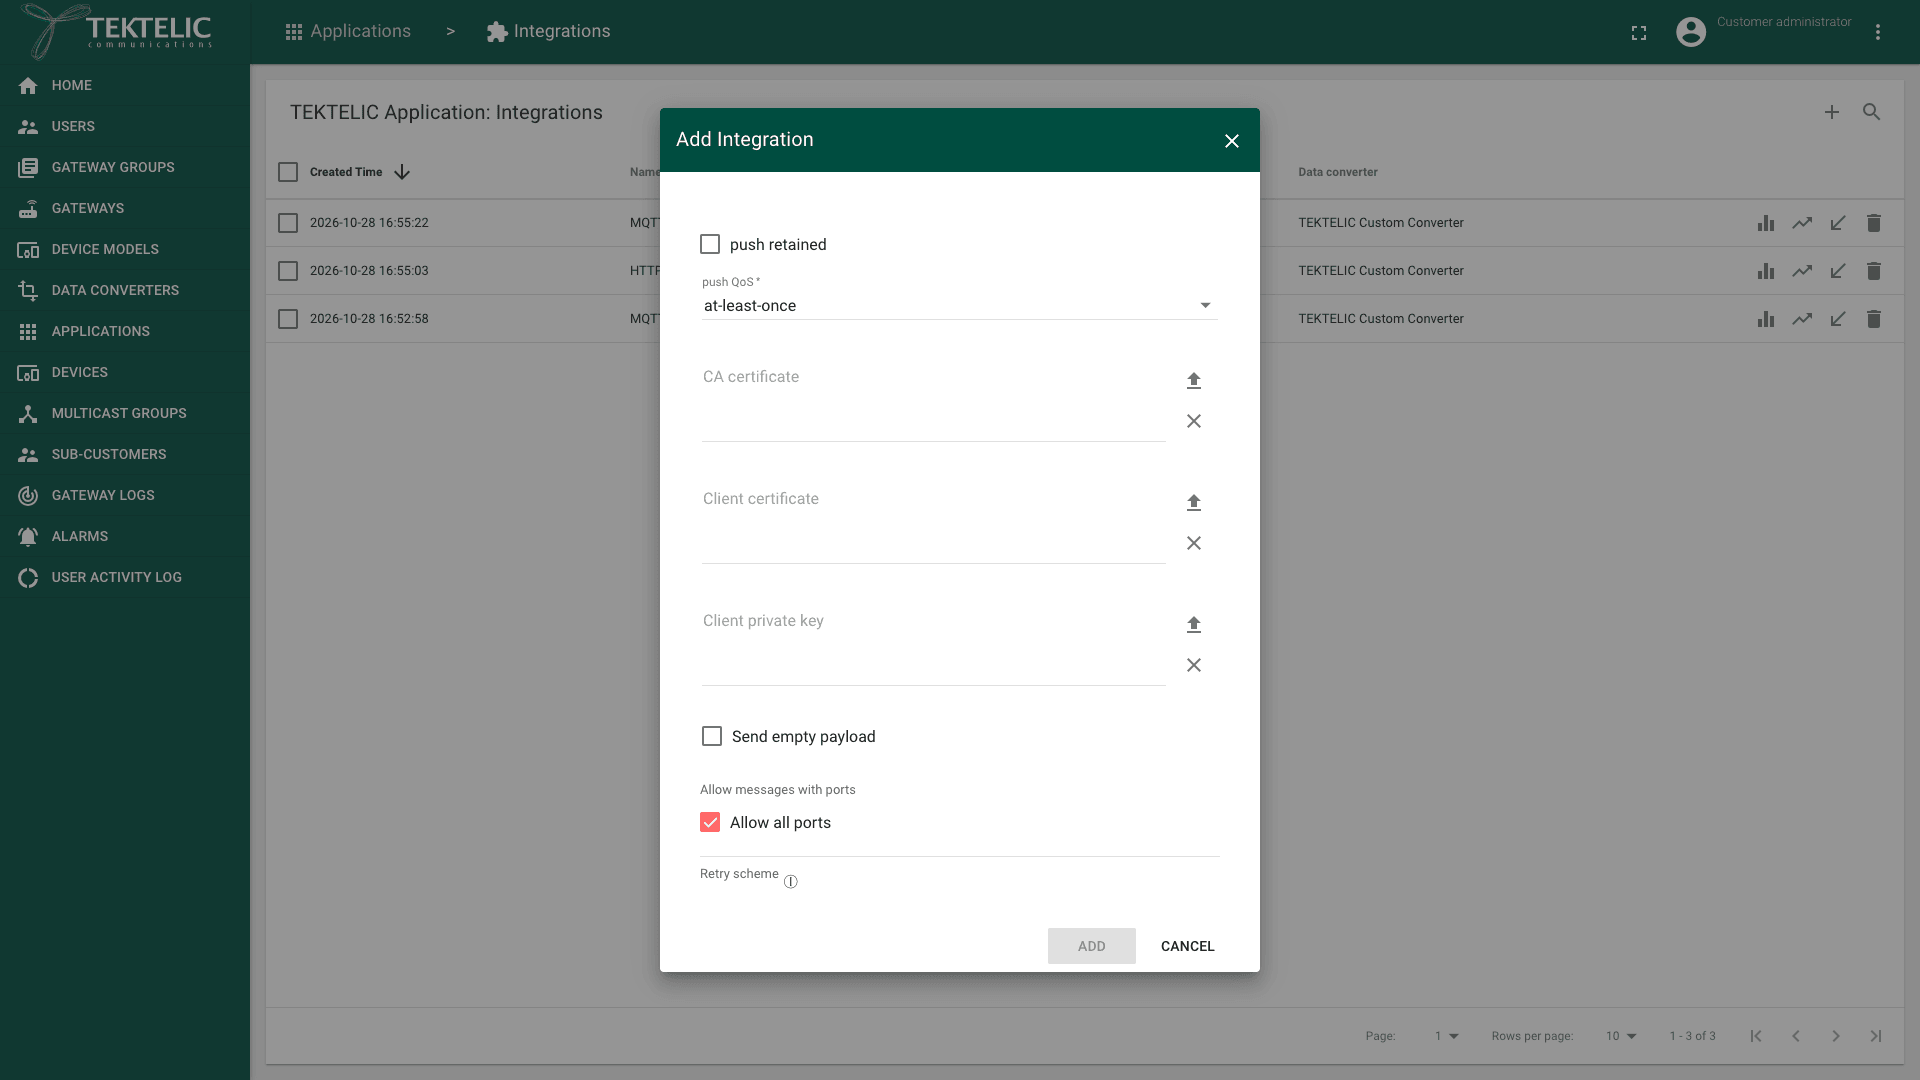
In CA certificate, paste the CA certificate of your broker. You can also select Upload certificate from file (the upload icon) and select the file. confirm the certificate format, for example PEM.
-
If your broker authenticates clients by certificate, paste the Client certificate, or upload it.
-
Paste the Client private key of that client certificate, or upload it. To remove a certificate, select Clear certificate (the × icon). confirm whether KONA Core supports an encrypted client private key, and where its password is entered.
Set the filters and save
- Leave Send empty payload cleared, unless your system needs uplinks without data. It's cleared by default.
- Leave Allow all ports selected to receive uplinks on every FPort. To receive only some ports, clear it and enter each port from
0to255in Allow messages with ports. - In Retry scheme, select the delays between attempts after a failed delivery, from 5 min to 48 h. The new integration starts with 5 min, 30 min and 1 h. We recommend these defaults.
- Select Add. The integration appears in the list with the type MQTT_V2, and KONA Core connects to your broker.
To change the integration later, select it in the list and select Toggle edit mode (the pencil icon). Change the fields, then select Apply changes (the check mark icon). To create integrations from your own system, use Save integration.
Check the result
- On your broker, subscribe to the Push Topic with any MQTT client.
- Wait for the next uplink of a device in the application. The message arrives on the Push Topic. Its body is a JSON object with the device metadata and the values your data converter returns. See Message Formats.
- In KONA Core, select the integration in the list. The Integration details panel opens.
- Select Show UL delivery statistics. It counts the uplinks the integration delivered.
- Select Show retry statistics. For an MQTT_V2 integration, it also shows the In-flight and Pending queue counts. A growing Pending queue means KONA Core can't deliver to your broker.
For the statistics in detail, see Integration Monitoring.
Send a downlink
To send a downlink, publish a message to the Pull Topic on your broker. The data converter's encoder turns your data into bytes. Use the V2 envelope with deviceEui, confirmed, msgId and an encoder-defined data object. See Message Formats and Write an Encoder.
Select Show DL statistics to see the downlinks the integration received. The downlink then waits in the device's downlink queue until the device's next receive window. See Uplink & Downlink Data Flow.
Troubleshooting
| Symptom | Likely cause | What to do |
|---|---|---|
| No message arrives on the Push Topic, and Pending queue grows. | KONA Core can't connect to your broker: a wrong address or port, a firewall, or wrong credentials. Or Enable TLS doesn't match the port. | Check the MQTT Broker Address (IP or domain name), Port, Username/Token and Password. Check that your broker accepts connections from the internet on that port. Check your broker's log for refused connections. Look for the event INTEGRATION_DISCONNECTED: its description gives the cause. When KONA Core connects again, the alarm clears with the description . The event can also report an initial connection failure, including rejected broker authorization. |
| The connection fails only with Enable TLS selected. | KONA Core doesn't trust your broker's certificate, or your broker requires a client certificate. | Paste the CA that signed your broker's certificate in CA certificate. If your broker requires client certificates, add the Client certificate and Client private key. |
| Messages arrive, but without decoded values. | The decoder fails or times out. The data converter form states an execution timeout of 100 ms. | Look for the events INTEGRATION_UL_DECODING_FAILURE and DECODER_BANNED. A decoder that times out 5 times within 600 seconds is banned for 30 minutes. See Write a Decoder. |
Still stuck? A Sub-Customer contacts their Customer, a Customer contacts their Provider, and a Provider contacts TEKTELIC Support. Send the integration name, the DevEUI of a device, the time in UTC, the exact error message and a screenshot of the integration details.