Migrate from V1 to V2
Overview
Move a legacy V1 integration of TEKTELIC KONA Core Network Server to its V2 type: HTTP to HTTP_V2, MQTT to MQTT_V2. You create the V2 integration next to the V1 one, compare what your system receives from both, and then delete V1. Until you delete V1, you can return to it at any time. Keep one integration delivering to your system at every point of the move.
We recommend V2 for every integration. V2 integrations use v2 data converters and all have a Retry scheme and delivery statistics. Of the V1 types, only HTTP has them; MQTT has neither. To compare all integration types, see Integrations Overview.
What changes from V1 to V2
The integration settings stay almost the same. The data converter, the messages and the downlink request change.
| Item | V1 (HTTP, MQTT) | V2 (HTTP_V2, MQTT_V2) |
|---|---|---|
| Data converter types | Custom and the preset types, such as Tektelic Home Sensor. confirm that Custom converters are listed for V1 integrations; the live NS lists the preset types. | Custom v2 only. |
| Decoder | Decoder(bytes, port). Returns any object. | decodeUplink(input). The input holds bytes, fPort, recvTime and tektelicMetadata. Returns data, errors, warnings and tektelicMetadata. |
| Encoder | Encoder(data). The template reads the Base64 payload from data.params.data and the port from data.params.port. Returns port and bytes. See V1 differences for the HTTP and MQTT message wrappers. | encodeDownlink(input). The input holds data, an object you define. Returns fPort, bytes, errors and warnings. |
| Uplink message to your system | HTTP: payloadMetaData and payload. MQTT: a device-EUI-keyed object containing ts and values. | Described in Message Formats. |
| HTTP downlink request | HTTP URL path /api/v1/integration/http/<routing key>. Body fields devEUI, data (a string), confirmed, msgId. | HTTP URL path /api/v2/integration/http/<routing key>. Body fields deviceEui, data (an object), confirmed, msgId. |
| MQTT topics | Push Topic and Pull Topic are both required. | Push Topic is required. Pull Topic is optional. |
| MQTT connection settings | Enable TLS, Client ID, Retry interval (seconds). | Enable TLS, Client ID, and also pendingQueue max size, max inflight messages, connection timeout (seconds), cleanSession, keepAlive interval (seconds), push retained, push QoS. |
| Retry scheme | HTTP has it. MQTT doesn't. | Both have it. |
| Statistics icons in the integrations list | HTTP has them. MQTT doesn't. | Both have them. |
The HTTP and HTTP_V2 forms have the same connection fields: Application address (IP or name without http or https prefix), Port, Base path, Enable HTTPS, Authentication method and Request headers.
Both versions have the same filters: Send empty payload and Allow messages with ports. They also have the same certificate fields: CA certificate, Client certificate and Client private key. Each integration has one data converter. You can't select a V1 converter for a V2 integration, so the migration always needs a new Custom v2 converter.
For the full settings of each V1 type, see HTTP V1 Integration and MQTT V1 Integration.
Before you start
- Role: Customer administrator, or Sub-Customer administrator for an application assigned to your Sub-Customer. User roles open integrations read-only. See Users, Roles & Permissions.
- Subscription plan: room for 1 more integration while V1 and V2 run side by side. The plan caps the number of integrations. See Subscription Plans & Limits.
- The V1 integration: an HTTP or MQTT integration on an application, and its settings written down. You re-enter them in the V2 integration.
- The V1 decoder and encoder: the code of the V1 data converter, or the name of the preset converter type it uses.
- Your system: you can change the code that receives uplinks and sends downlinks, because the V2 message format is different.
Steps
Step 1. Write down the V1 settings
-
In the side menu, select Applications.
-
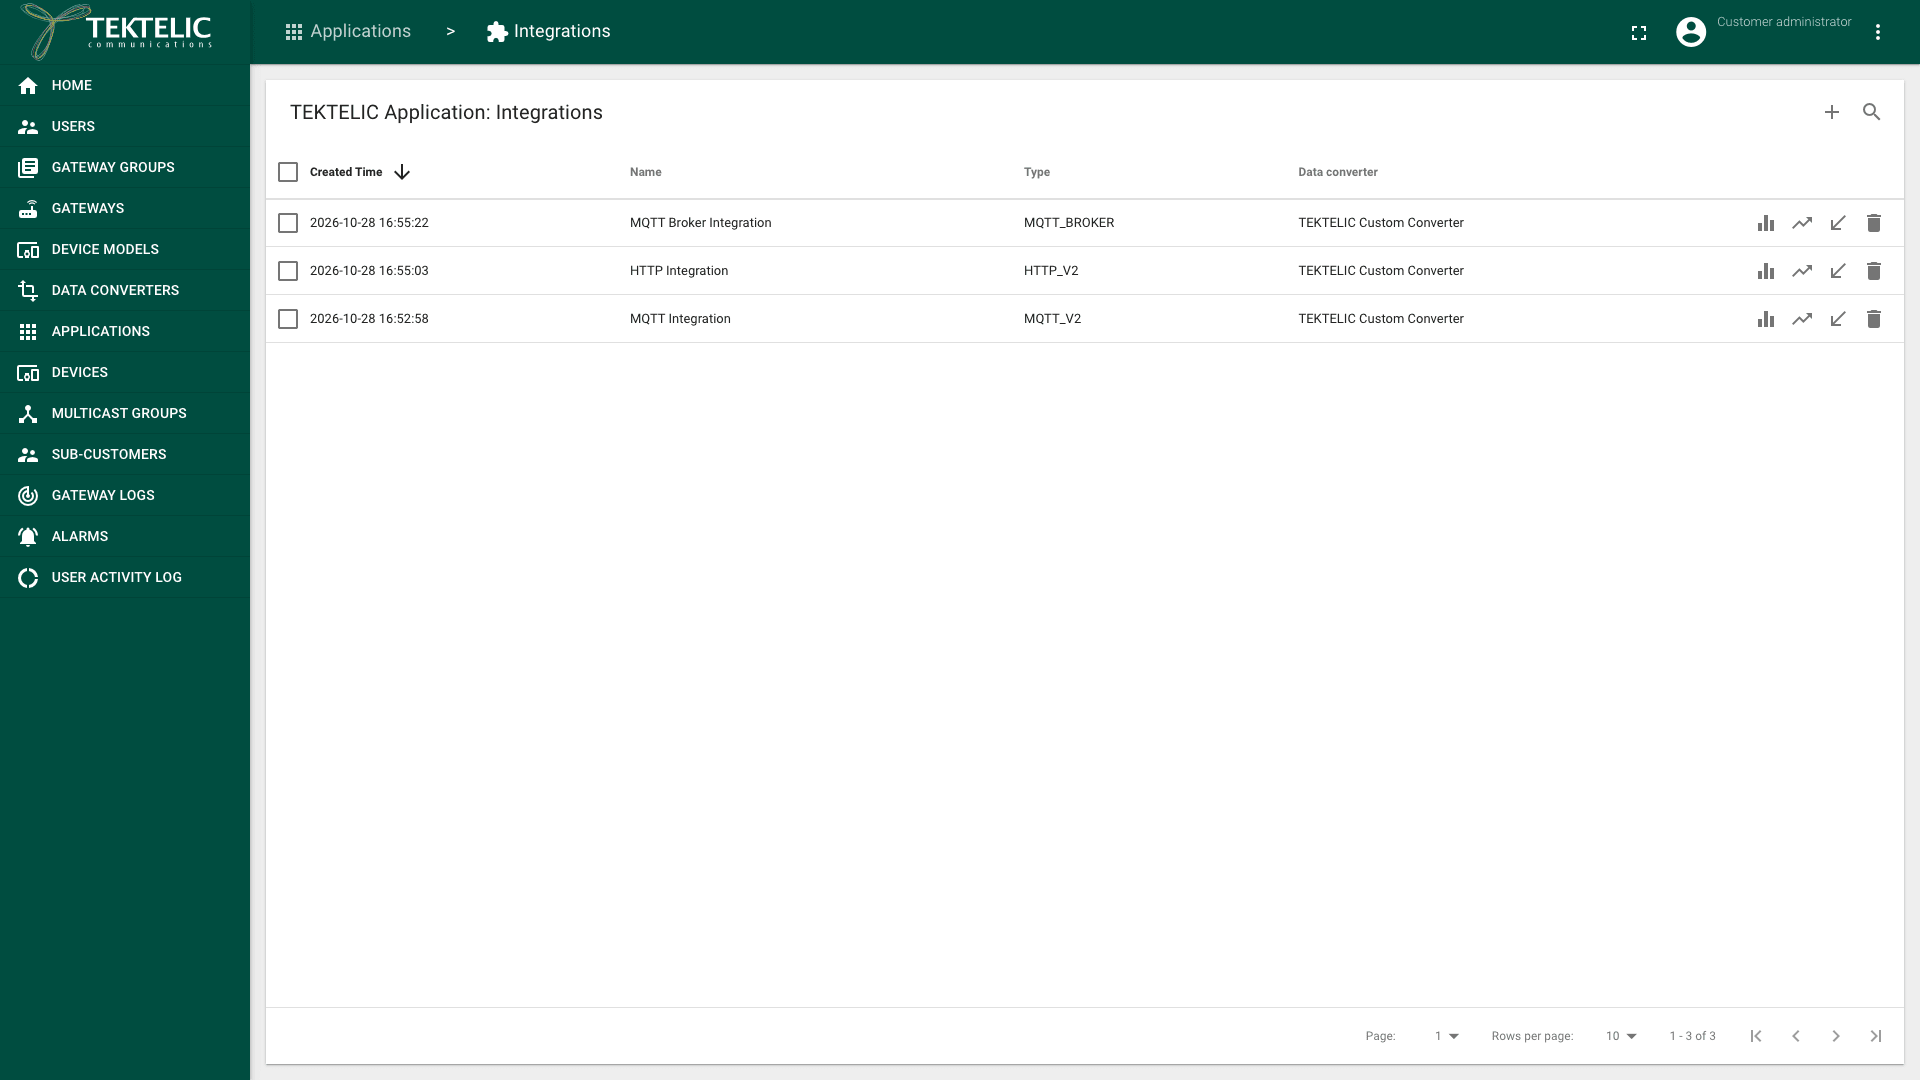
In your application's row, select the Manage integrations icon. The application's integrations page opens, titled with the application name and Integrations.
-
Select the V1 integration in the list. Its Type column shows HTTP or MQTT. The Integration details panel opens.
-
Write down every setting: the address, Port, Base path or topics, the authentication, the certificates, the filters and the Retry scheme. Don't change anything.
-
Note the name in the Data converter column. In the side menu, select Data converters and open that converter.
-
Copy its Decoder and Encoder code. A preset type, such as Tektelic Home Sensor, has no code to copy: note the type instead.
Step 2. Create a v2 data converter
- Write a v2 decoder that returns the same values as your V1 decoder, in the
decodeUplink(input)format. See Write a Decoder. For a TEKTELIC device, start from TEKTELIC Device Converters Library. - If your system sends downlinks, write a v2 encoder in the
encodeDownlink(input)format. See Write an Encoder. - In the side menu, select Data converters, then Add Data Converter.
- Enter a Name, and in Type, select Custom v2.
- Paste your decoder into Decoder and your encoder into Encoder.
- Select Add. For the full procedure, see Payload Converters Overview.
Step 3. Prepare your system for the V2 format
Make this change before you add the V2 integration. The V2 integration delivers uplinks as soon as it is saved.
- Add a V2 receiver to your system: a new HTTP path for HTTP, or a new MQTT topic for MQTT. Keep the V1 receiver running. We recommend a separate path or topic, so your system can tell V1 and V2 messages apart.
- Make the V2 receiver read the V2 message format. See Message Formats.
- For HTTP downlinks, prepare requests with the V2 body fields:
deviceEuiinstead ofdevEUI, anddataas an object. The request goes to the V2 HTTP URL path that KONA Core shows after Step 4.
Step 4. Add the V2 integration next to V1
-
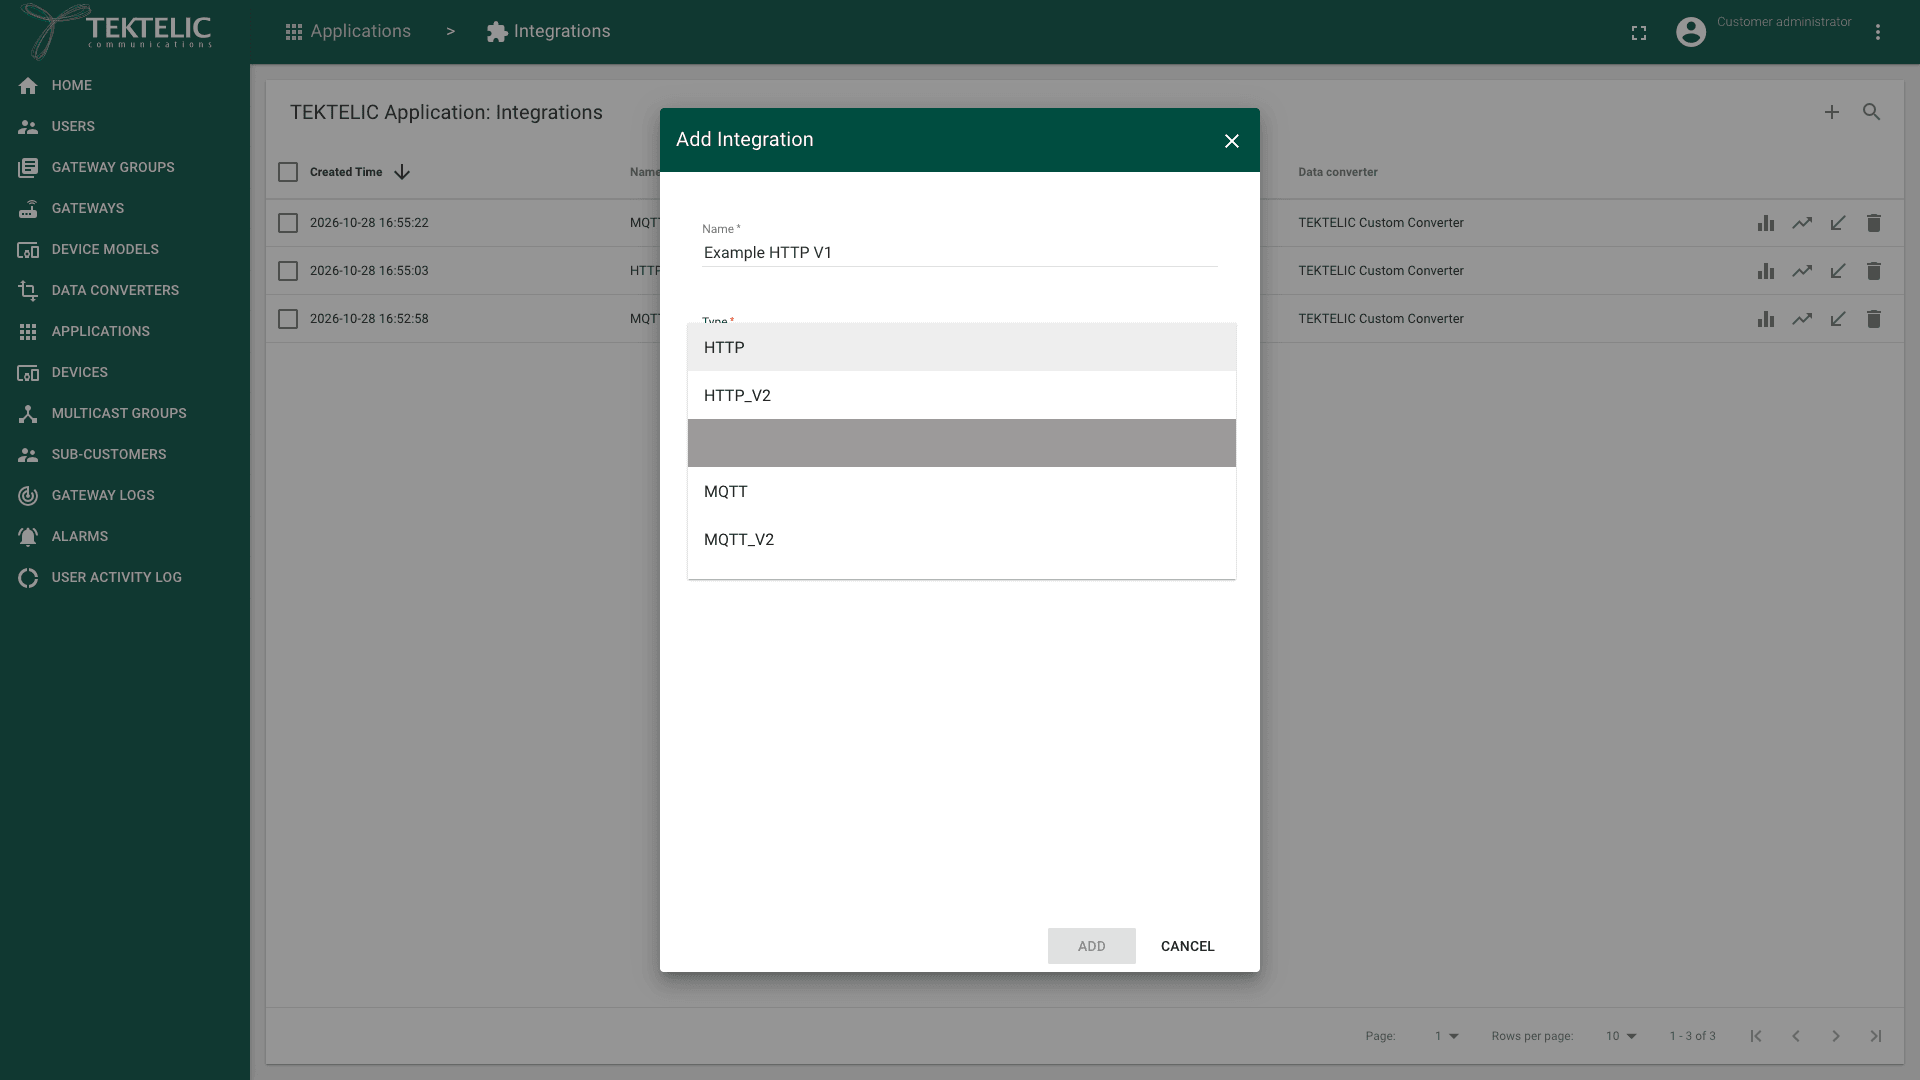
On the application's integrations page, select Add Integration (the + icon). The Add Integration dialog opens.
-
Enter a Name that shows the version, for example the V1 name followed by
V2. -
In Type, select HTTP_V2 to replace HTTP, or MQTT_V2 to replace MQTT.
-
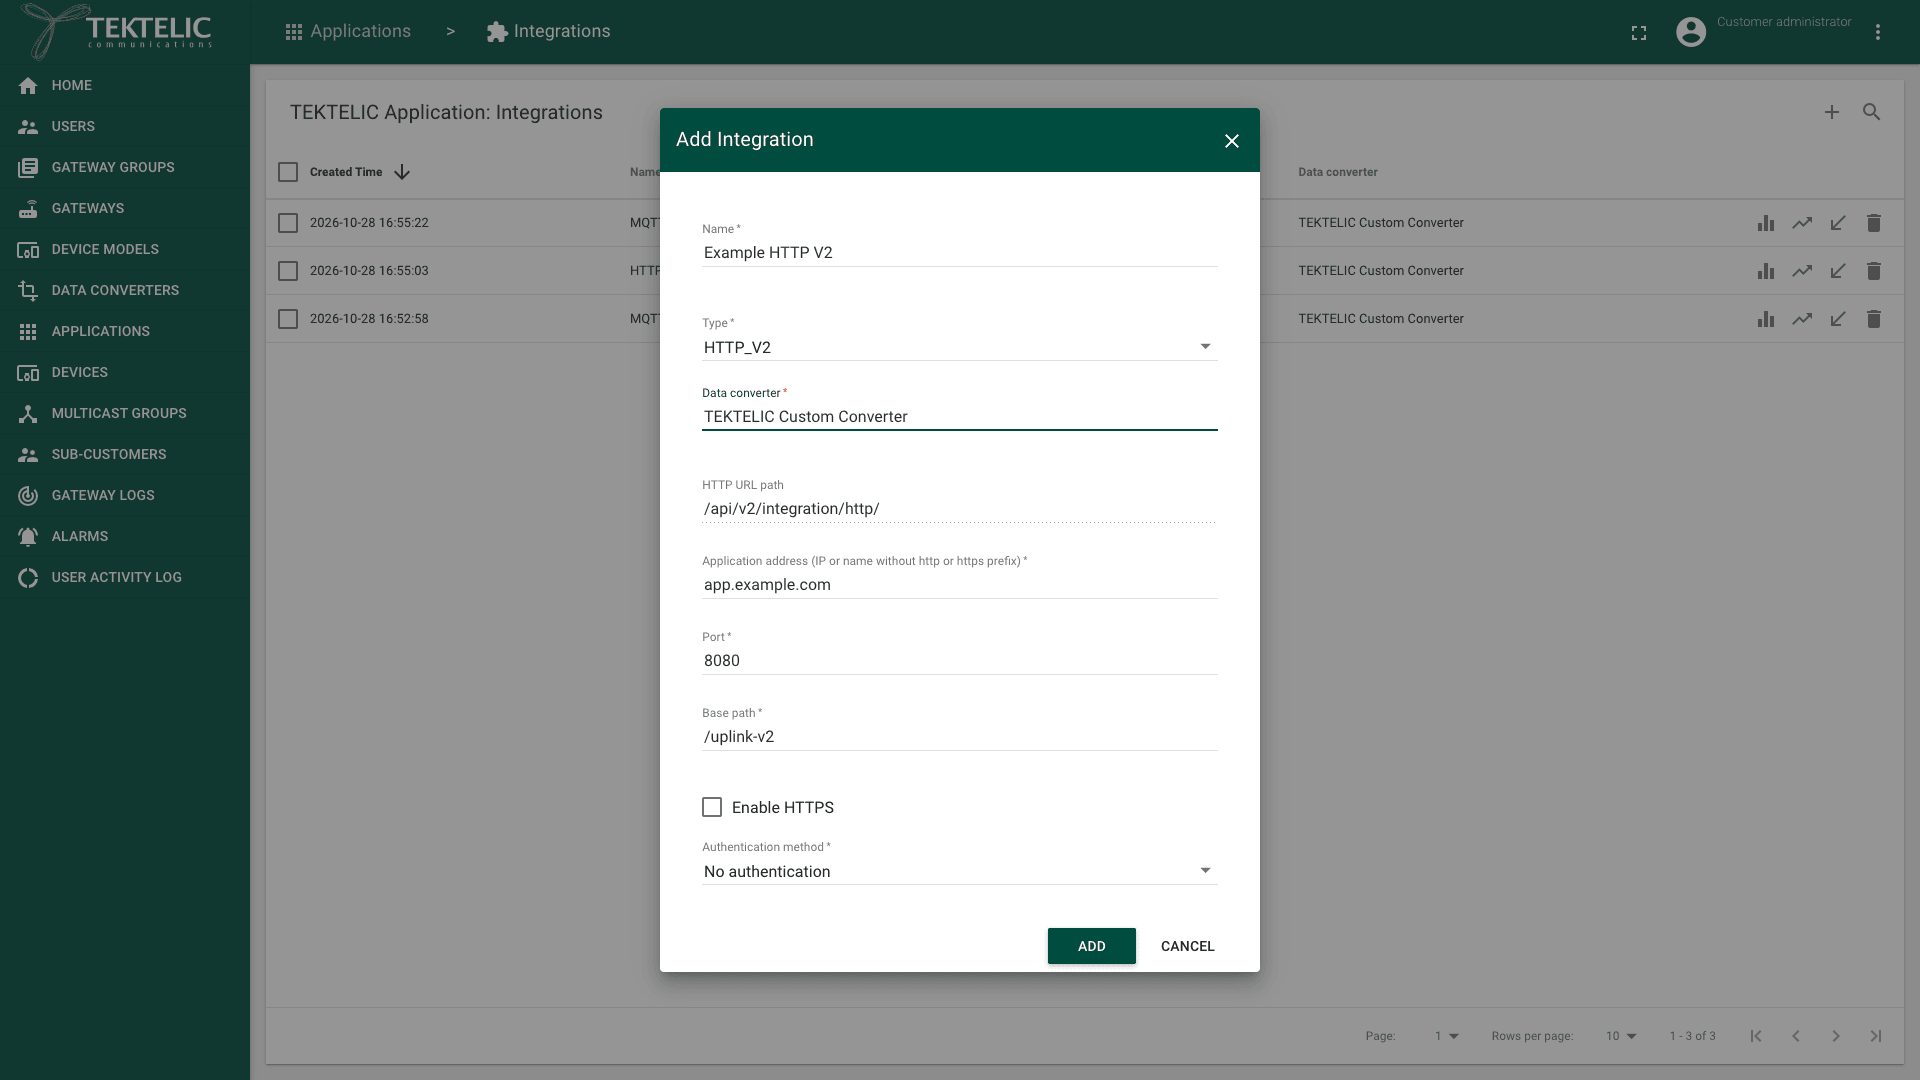
In Data converter, select the v2 converter from Step 2. The list shows only v2 converters.
-
Enter the settings you wrote down in Step 1. Use the V2 path from Step 3 in Base path, or the V2 topic in Push Topic.
-
Set the same Send empty payload and Allow messages with ports filters as in V1, so both integrations get the same uplinks.
-
Keep the Retry scheme at its default of 5 min, 30 min and 1 h, unless you need longer retries.
-
Select Add. The V2 integration appears in the list next to V1. For the full V2 settings, see HTTP Integration and MQTT Integration.
While V1 and V2 both run, your system gets every uplink twice: once from each integration. Store or process the data from one integration only, or mark the duplicates. If your system sends the same downlink to both integrations, the device gets it twice.
Step 5. Compare V1 and V2
- Wait until every device of the application has sent several uplinks. We recommend at least one full day, so devices with long reporting intervals are included.
- Compare the uplinks your system received from V1 and from V2. Check that each V1 uplink has a V2 uplink for the same device and time, with the same decoded values.
- If you use downlinks, send a test downlink to one test device through the V2 integration. Check that the device receives it. See Send Downlinks.
- On the integrations page, in the V2 integration's row, select Show UL delivery statistics. Check that Delivered counts grow and Dropped stays at 0. See Integration Monitoring.
- In the side menu, select Data converters. In the v2 converter's row, select Show converter statistics. Check that Invocation failed (total) stays at 0.
If the values differ, fix the v2 decoder and compare again. V1 keeps delivering in the meantime.
Step 6. Switch your system to V2
- Switch your system to use the V2 data only.
- Switch downlinks to the V2 integration.
- Keep the V1 integration running for at least one more week, so you can still return to it. We recommend this period because a deleted integration can't be restored.
Step 7. Delete the V1 integration
-
On the integrations page, in the V1 integration's row, select Delete (the trash icon). A dialog asks whether you are sure you want to delete the integration, with its name.
Delete integration confirmation dialog. Not taken: the test account's integrations are in use, and the dialog is only shown for a delete.
-
Select Yes to confirm. The integration disappears from the list. confirm what happens to V1 retries that are already scheduled when you delete the integration.
-
If no other integration uses the V1 data converter, delete it in Data converters.
Deleting an integration can't be undone. The dialog warns: Be careful, after the confirmation the integration and all related data will become unrecoverable. Delete V1 only after you have checked the V2 data.
Roll back to V1
How you return to V1 depends on whether V1 still exists.
Before you delete V1 (Steps 4 to 6): V1 keeps running, so your system keeps getting the V1 data.
- Switch your system back to the V1 data and the V1 downlink requests.
- On the integrations page, delete the V2 integration.
- Fix the issue, then start again at Step 2.
After you delete V1 (Step 7): you can't restore the deleted integration. Re-create it from the settings you wrote down in Step 1:
- Select Add Integration, and in Type, select HTTP or MQTT.
- Select the V1 data converter, or re-create it from the code you copied.
- Enter the settings from Step 1, then select Add.
- For HTTP downlinks, use the new HTTP URL path from the new integration. confirm that a re-created integration gets a new routing key, and a new HTTP URL path.
KONA Core delivers an uplink only to the integrations that exist when it arrives. An uplink that arrives while no integration feeds your system doesn't reach it. confirm whether KONA Core can resend uplinks that no integration delivered.
Check the result
The migration is done when all of these are true:
- On the application's integrations page, the Type column shows HTTP_V2 or MQTT_V2, and no HTTP or MQTT integration is left.
- The Data converter column shows your v2 converter.
- Your system receives each uplink once, in the V2 format.
- Show UL delivery statistics shows Delivered counts for the V2 integration.
- A test downlink through the V2 integration reaches the device.
Troubleshooting
| Symptom | Likely cause | What to do |
|---|---|---|
| The Data converter list of the V2 integration doesn't show your converter. | The converter is a V1 type. A V2 integration lists only Custom v2 converters. | Create a Custom v2 converter (Step 2). |
| Your system gets each uplink twice. | V1 and V2 both run, as expected during the migration. | Process the data of one integration only. Delete V1 when the comparison is done (Step 7). |
| V2 delivers different or empty values. | The v2 decoder doesn't return the values in data, or it returns errors. | Check Show converter statistics of the v2 converter, then fix the decoder. See Write a Decoder. |
Still stuck? A Sub-Customer contacts their Customer, a Customer contacts their Provider, and a Provider contacts TEKTELIC Support. Send the application name and the names of both integrations. Add the DevEUI of an affected device, the time in UTC, the exact error message and a screenshot.
Related
- Integrations Overview
- Message Formats
- HTTP V1 Integration
- MQTT V1 Integration
- HTTP Integration
- MQTT Integration
- Payload Converters Overview
- Integration Monitoring
- API Reference: to send HTTP downlinks from your system, use Process downlink v2.