MQTT V1 Integration
MQTT is a legacy V1 integration type. We recommend MQTT_V2 for every new integration: see MQTT Integration. To move an existing MQTT integration, see Migrate from V1 to V2.
Overview
Configure a legacy MQTT integration in TEKTELIC KONA Core Network Server. KONA Core connects to your MQTT broker and publishes the uplinks of an application to the Push Topic. Use this guide to maintain an existing V1 setup, or when your system can only read the V1 format.
KONA Core still lists MQTT in the Type list of the Add Integration dialog, without a deprecation mark. confirm the official deprecation status of the V1 integration types and any end-of-support date.
Compared with MQTT_V2, an MQTT integration has no Retry scheme and no statistics icons in the integrations list. For all differences, see Migrate from V1 to V2.
Before you start
- Role: Customer administrator, or Sub-Customer administrator for an application assigned to your Sub-Customer. User roles open integrations read-only. See Users, Roles & Permissions.
- Subscription plan: room for 1 more integration. See Subscription Plans & Limits.
- Application: an application with the devices whose data you want to forward. See Manage Applications.
- V1 data converter: a data converter of a V1 type: Custom or a preset type, such as Tektelic Home Sensor. A Custom v2 converter doesn't work with MQTT. See Payload Converters Overview.
- Your MQTT broker: reachable from the internet, with its address, port, and the username and password for KONA Core, if the broker requires them.
- Two topics: one topic for uplinks and one for downlinks. Both are required. For both message formats, see V1 differences.
Steps
-
In the side menu, select Applications.
-
In your application's row, select the Manage integrations icon. You can also select the application and then Manage integrations in its details panel. The application's integrations page opens, titled with the application name and Integrations.
-
Select Add Integration (the + icon). The Add Integration dialog opens.
-
Enter a Name. The name is required.
-
In Type, select MQTT. The MQTT fields appear, with Port set to
1883and Retry interval (seconds) set to30. -
In Data converter, select your V1 converter. The list shows only V1 converters, such as the preset types.
-
Enter the MQTT Broker Address (IP or domain name), for example
broker.example.com. -
Enter the Port of your broker, from
0to65535. The default is1883. If you select Enable TLS in step 12, enter the TLS port of your broker. -
Enter the Username/Token and Password for KONA Core on your broker. Both are optional. Leave them empty if your broker accepts clients without credentials.
-
Enter the Push Topic: the topic to which KONA Core publishes uplinks, for example
example/uplink. The field is required. -
Enter the Pull Topic: the topic on which KONA Core receives downlinks from your system, for example
example/downlink. The field is required. KONA Core subscribes to this topic. The V1 downlink has adevicefield and adataobject containing the encoder input.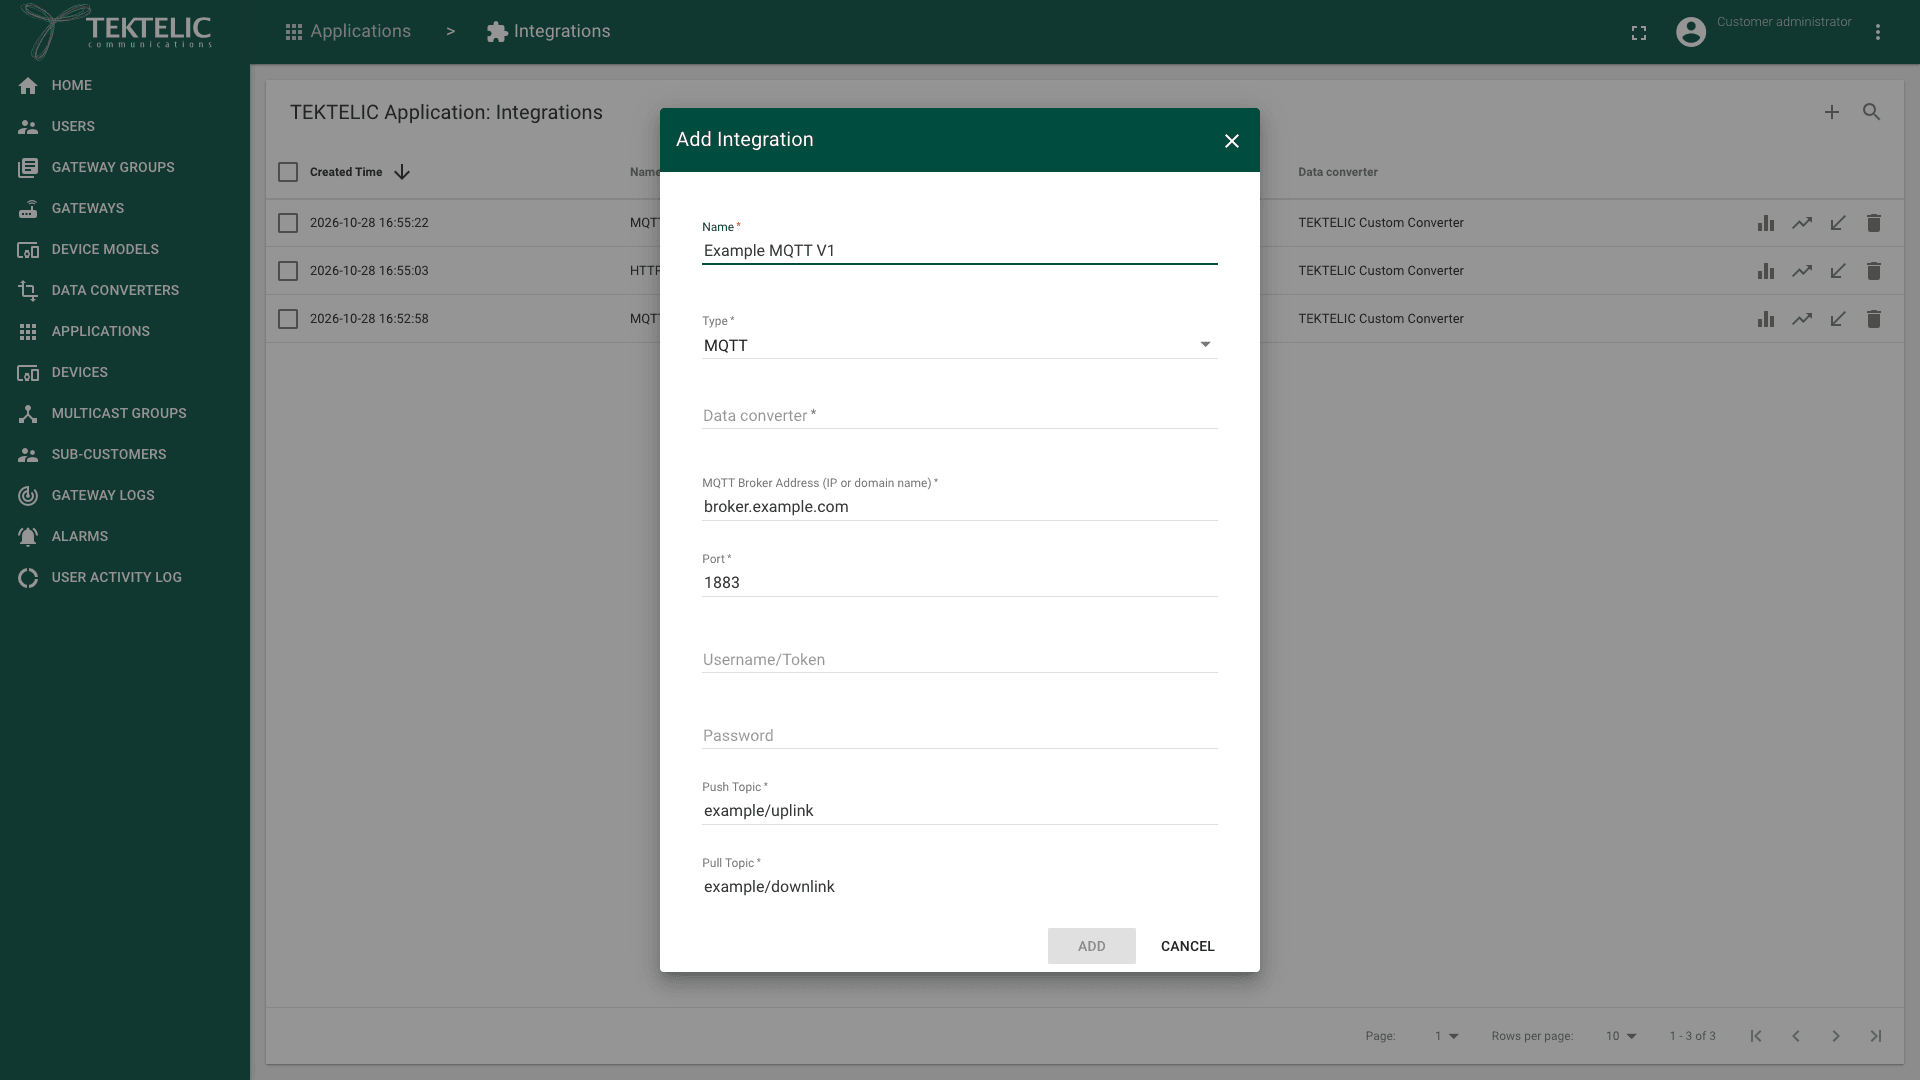
-
Select Enable TLS. We recommend TLS, so the data is encrypted on its way to your broker. Enable TLS is cleared by default.
-
Optional: enter a Client ID. confirm which client ID KONA Core uses when the field is empty.
-
Keep Retry interval (seconds) at
30. confirm what the Retry interval (seconds) applies to, for example reconnecting to the broker or resending a message. -
Optional: under CA certificate, Client certificate and Client private key, select Upload certificate from file to add certificates. Add them only if your broker uses its own CA, or requires a client certificate. confirm the accepted certificate file formats.
-
Leave Send empty payload cleared, unless your system needs uplinks without data, for example to track that a device is alive.
-
Under Allow messages with ports, keep Allow all ports selected. To forward only some ports (FPort), clear Allow all ports and enter each port from
0to255.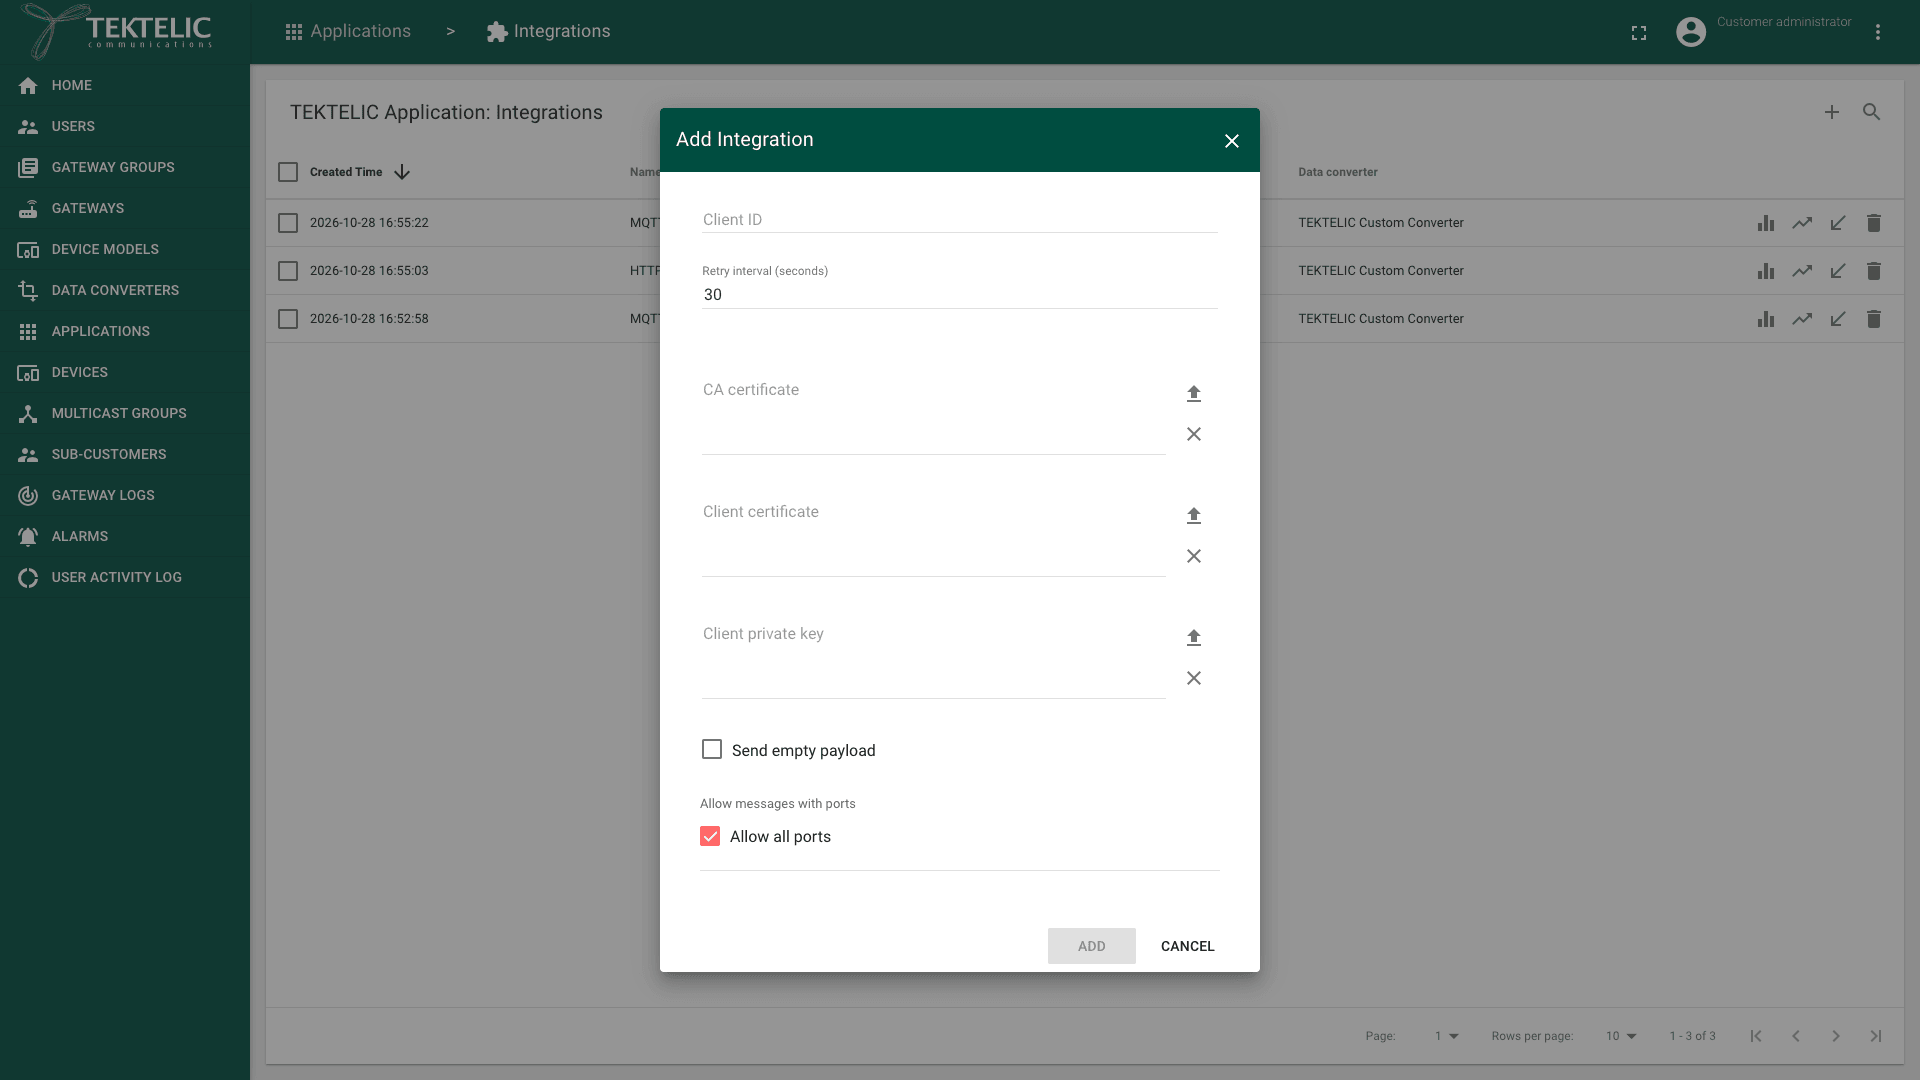
-
Select Add. The integration appears in the list, with MQTT in the Type column.
Check the result
- On the application's integrations page, check that the integration shows MQTT in the Type column and your converter in the Data converter column.
- On your broker, subscribe to the Push Topic with an MQTT client.
- Wait for the next uplink of a device in the application. Check that a message arrives on the Push Topic.
The integrations list has no delivery statistics for an MQTT integration. To check the data converter, select Data converters in the side menu, and select Show converter statistics in the converter's row. See Integration Monitoring.
Troubleshooting
| Symptom | Likely cause | What to do |
|---|---|---|
| Add stays unavailable. | A required field is empty: Name, Data converter, MQTT Broker Address (IP or domain name), Port, Push Topic or Pull Topic. | Fill in every field marked with an asterisk. The form can show Token is required. under Username/Token while a topic is empty. confirm that this message refers to the empty topic fields. |
| Your converter isn't in the Data converter list. | The converter is a Custom v2 converter. MQTT lists only V1 converters. | Use MQTT_V2 with the v2 converter: see MQTT Integration. |
| No message arrives on the Push Topic. | KONA Core can't connect to the broker: the address, port, credentials or TLS setting doesn't match the broker. Or the broker doesn't allow KONA Core to publish to the topic. | Check each field against your broker's settings and its access rules. Check the broker's log for connections from KONA Core. For integration events such as INTEGRATION_DISCONNECTED, see Integration Monitoring. MQTT V1 also reports INTEGRATION_DISCONNECTED for connection failures. |
Still stuck? A Sub-Customer contacts their Customer, a Customer contacts their Provider, and a Provider contacts TEKTELIC Support. Send the application and integration names, the DevEUI of an affected device, the time in UTC, the exact error message and a screenshot.
Related
- Migrate from V1 to V2
- MQTT Integration
- MQTT Broker Integration
- HTTP V1 Integration
- Integrations Overview
- Message Formats
- Payload Converters Overview
- Integration Monitoring
- API Reference: to add the integration from your own system, use Save integration.