Write an Encoder
Overview
Write an encoder in JavaScript that turns a JSON command from your system into the bytes of a downlink. You add it to a Custom v2 data converter in TEKTELIC KONA Core Network Server. At the end, your system sends readable JSON through an integration, and the device receives the bytes it expects.
You need an encoder only for downlinks through an integration. To send bytes by hand from the KONA Core UI, see Send Downlinks. An encoder sits in the same converter as the decoder: see Write a Decoder.
Before you start
- Role: Customer administrator or Sub-Customer administrator. The Customer user role opens Data converters read-only. The Sub-Customer user role doesn't see Data converters. See Users, Roles & Permissions.
- Downlink description: the device's downlink format from its manufacturer: the FPort, the bytes of each command and their allowed values. For a TEKTELIC device, see its technical documentation. confirm where TEKTELIC publishes the downlink formats of its devices.
- The JSON your system sends: decide which fields your system puts in the downlink
dataobject, for example a report interval. - Optional, for local tests: Node.js or a browser console, to run the encoder before you add it to KONA Core.
Steps
Understand the encoder function
KONA Core wraps your code in this function. You write only the function body:
function encodeDownlink(input) {
    // your code
}
The input object has one field, as the default template in the editor lists it:
| Field | Type | What it holds |
|---|---|---|
data | Object | The downlink data your system sends through the integration. You define its fields ("customer-defined" in the template). KONA Core passes the downlink message's data object as input.data. |
Return an object with these fields:
| Field | Type | What it holds |
|---|---|---|
fPort | int | The FPort KONA Core sends the downlink on. |
bytes | int[] | The downlink payload, one integer from 0 to 255 per byte. |
errors | string[] | Errors found while encoding. Use an empty array when there are none. |
warnings | string[] | Warnings. Use an empty array when there are none. |
confirm how KONA Core handles a result with a non-empty errors array, for example whether it drops the downlink and raises INTEGRATION_DL_ENCODING_FAILURE.
The default template of a new Custom v2 converter shows the same structure:
    // input object structure:
    // - data - Object (customer-defined)


    // output object structure:
    // - fPort - int
    // - bytes - int[]
    // - errors - string[]
    // - warnings - string[]
    return {
        "fPort": 0,
        "bytes": [],
        "errors": [],
        "warnings": []
    };
The encoder execution timeout is 100 ms. If an encoder exceeds it 5 times within 600 seconds, KONA Core bans it for 30 minutes. the timeout note says a ban follows 5 timeouts within 600 seconds, the ban message says the code is banned "due to errors during execution"; confirm whether other errors also count toward a ban.
We recommend plain ES5 syntax, as in the template: var, function and no arrow functions.
Write the encoder
The example below encodes a command for a fictional "Example sensor". It isn't a real device: use it as a pattern for your own downlink. The sensor takes 2 bytes on FPort 20:
| Byte | Value | Format |
|---|---|---|
| 0 | Report interval | Unsigned integer, in minutes, 1 to 255 |
| 1 | LED | 1 means on, 0 means off |
Your system sends this data object:
{"reportInterval": 15, "ledOn": true}
The encoder turns it into the bytes 0F 01 on FPort 20:
    // Fictional "Example sensor": 2 bytes on FPort 20.
    var interval = input.data.reportInterval;

    if (typeof interval !== "number" || interval % 1 !== 0 || interval < 1 || interval > 255) {
        return {
            "fPort": 20,
            "bytes": [],
            "errors": ["reportInterval must be a whole number from 1 to 255"],
            "warnings": []
        };
    }

    var warnings = [];
    if (typeof input.data.ledOn !== "boolean") {
        warnings.push("ledOn missing: LED set to off");
    }

    return {
        "fPort": 20,
        "bytes": [interval, input.data.ledOn === true ? 1 : 0],
        "errors": [],
        "warnings": warnings
    };
Check every value before you put it into bytes. A value outside 0 to 255 doesn't fit in one byte, and the device gets a different command than you meant.
Test the encoder locally
The converter editor has no test run: KONA Core runs the encoder only on real downlinks. Test your code first on your computer.
-
Create a file
test-encoder.jswith this content. Paste your encoder body inside the function:function encodeDownlink(input) {// paste the encoder body here}console.log(JSON.stringify(encodeDownlink({data: {"reportInterval": 15, "ledOn": true}}))); -
Run
node test-encoder.jsin a terminal. For the example sensor, the output is:{"fPort":20,"bytes":[15,1],"errors":[],"warnings":[]} -
Repeat with wrong input:
{"reportInterval": 300}must return an error and no bytes.
Add the encoder to KONA Core
-
In the side menu, select Data converters.
-
Select your converter's name. The Data converter details panel opens. To start a new converter instead, select the + icon and the Custom v2 type, as in Write a Decoder.
-
Select the pencil icon (Toggle edit mode).
-
In the Encoder editor, replace the template body with your encoder. The lines
function encodeDownlink(input) {and}stay outside the editor.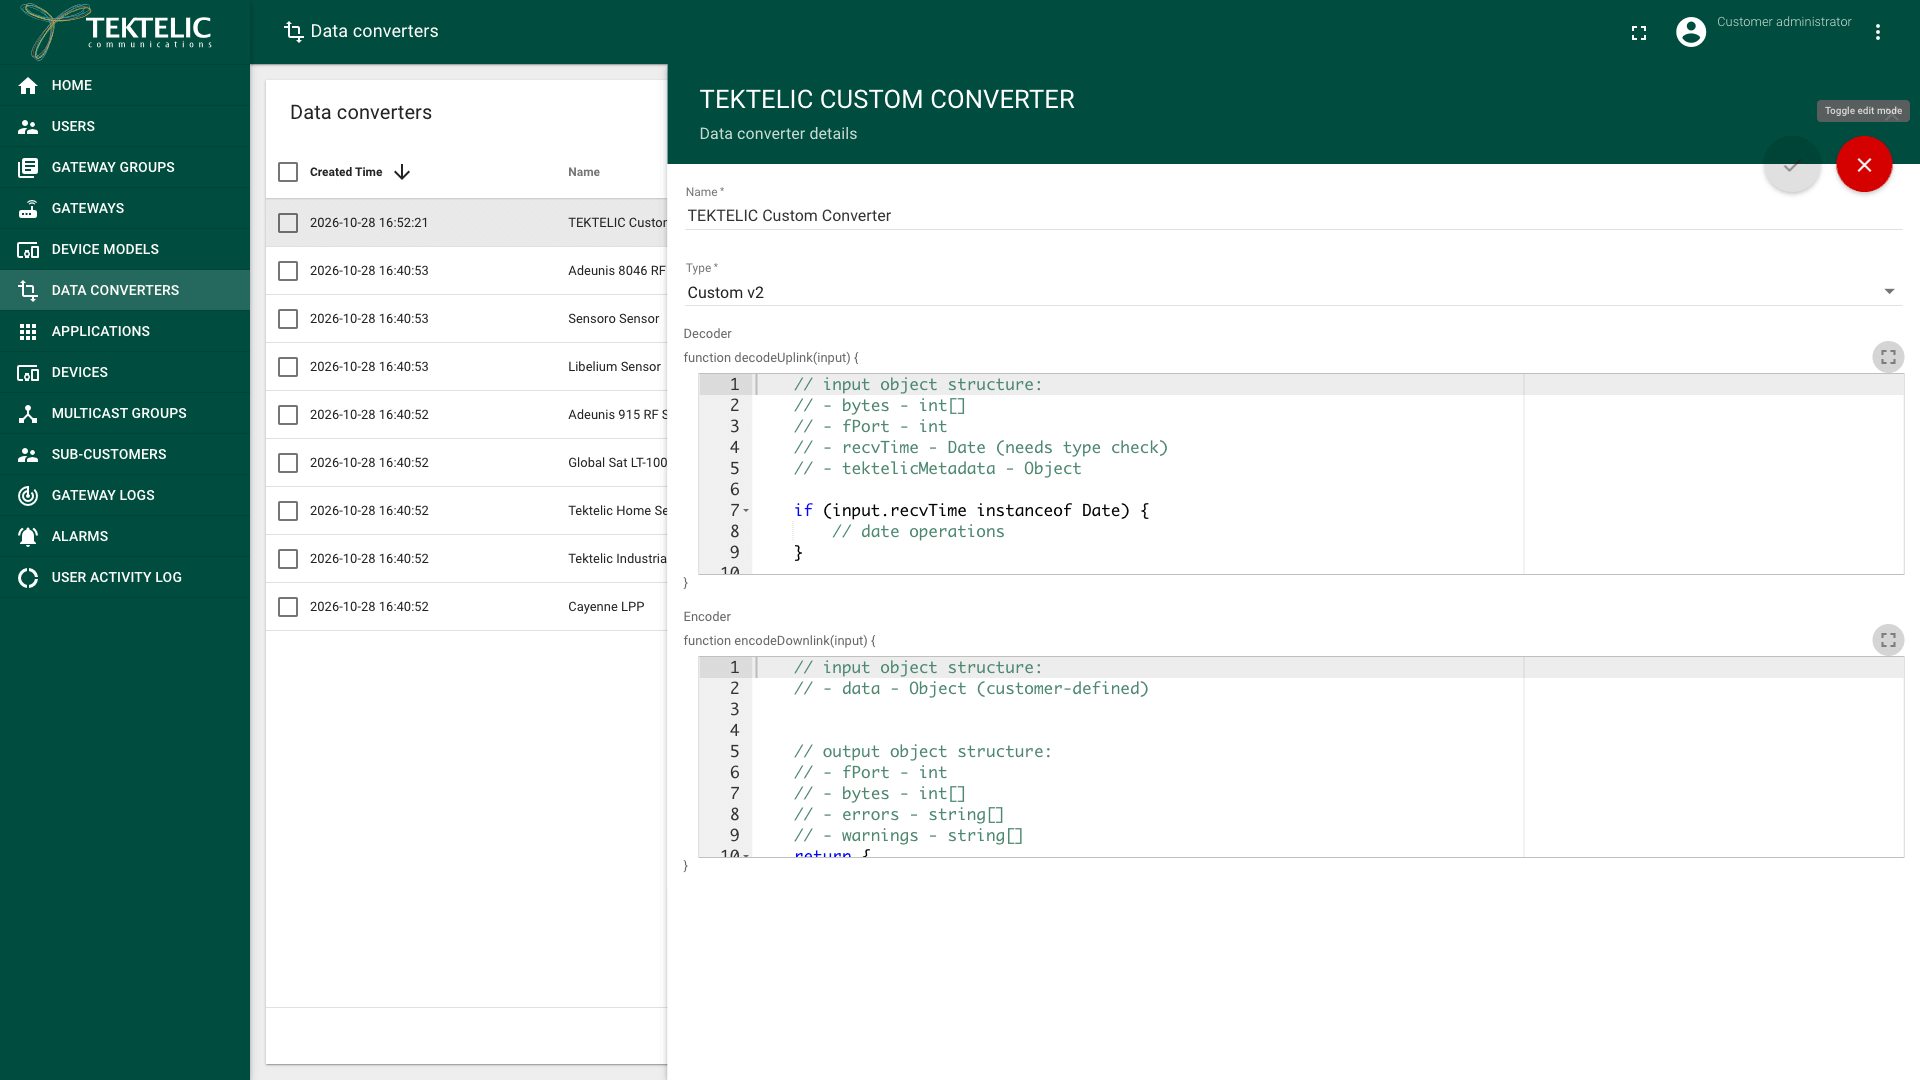
-
Select the check mark icon (Apply changes). KONA Core uses the new code for the next downlinks. confirm whether KONA Core checks the code when you save a converter, and which message it shows for invalid code.
The integration that uses this converter now encodes downlinks with your code. To send them from your system, see MQTT Broker Integration, HTTP Integration or MQTT Integration. For HTTP_V2, the operation is Process downlink v2.
Check the result
- Send a downlink from your system through the integration, with your
dataobject. - In the side menu, select Devices, then your device.
- Select the Downlink queue tab. The downlink appears with the Port your encoder returned, until the device's next receive window. For when a device takes its downlinks, see Send Downlinks.
- In Data converters, select the statistics icon in your converter's row. In the Encoder columns of Converter statistics, Invoked grows with each downlink and Invocation failed (total) stays at 0.
The same counters are in the API: Get converter encoder stats by converter ID.
Troubleshooting
| Symptom | Likely cause | What to do |
|---|---|---|
No downlink in the queue, and KONA Core raises INTEGRATION_DL_ENCODING_FAILURE. | The encoder throws an exception, for example on a missing field in data. | Run the same data object through your local test. Check that each field exists before you read it. |
KONA Core raises INVALID_DL_PAYLOAD. | The encoder result isn't a valid downlink, for example a byte outside 0 to 255 or a wrong FPort. confirm which encoder results raise INVALID_DL_PAYLOAD. | Check the fPort and every value in bytes. |
| Encoder banned shows Yes. The editor shows . | The encoder exceeded the 100 ms timeout 5 times within 600 seconds. KONA Core skips its runs for 30 minutes. | Remove slow code, such as long loops. Fix the encoder and wait for the ban to end. |
To get notified when an encoder is banned, add an application alarm rule with the trigger Encoder is banned. See Configure Application Alarm Rules and Events & Alarms.
Still stuck? A Sub-Customer contacts their Customer, and a Customer contacts their Provider. Send the converter name, the DevEUI of the device, the time of the downlink in UTC, the data object you sent and your encoder code.