Onboard a Third-Party Device
Overview
Add a LoRaWAN® device from another manufacturer to TEKTELIC KONA Core Network Server. You create a device model for it, add the device with its keys, and attach a data converter that decodes its payload. At the end, the device is online and its data reaches your system.
For TEKTELIC devices, follow Onboard a TEKTELIC Device instead: their device models and converters already exist.
Before you start
- Role: Customer administrator or Sub-Customer administrator. Both administrator roles can add devices, device models and data converters. User roles open devices read-only and don't see Add Device. See Users, Roles & Permissions.
- Application: an application to add the device to. See Manage Applications.
- Gateway: at least 1 gateway in range of the device, shown as Online.
- Subscription plan: room for 1 more device. See Subscription Plans & Limits.
- Device documentation from the manufacturer, with:
Steps
Step 1. Create or pick a device model
A device model supplies the device class when you add a device. Create one model for each product and class you use. For later model changes, see Manage Device Models.
-
In the side menu, select Device models. The Device models page opens.
-
Check whether a model for your device already exists. If it does, go to Step 2. Add the device.
-
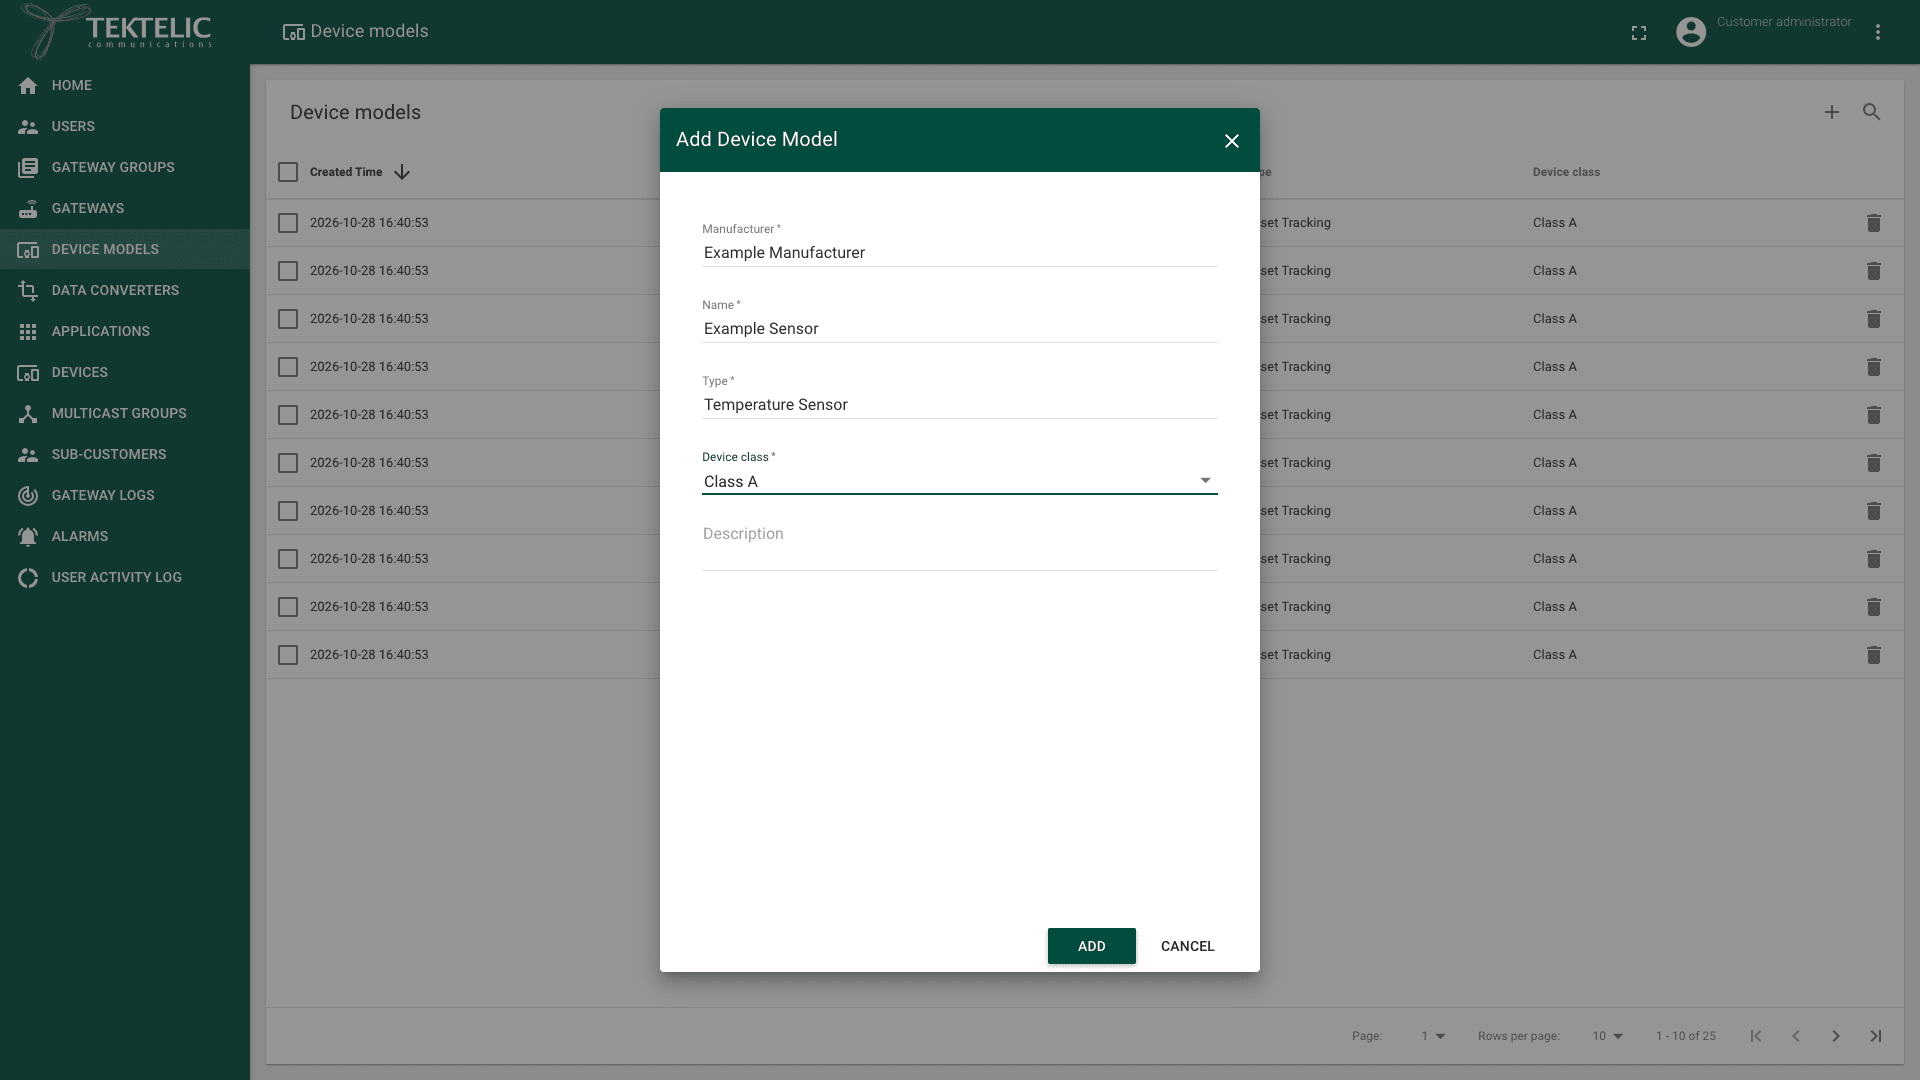
Select Add Device Model (the + icon). The Add Device Model dialog opens.
-
Enter the Manufacturer, for example the manufacturer's name as it writes it.
-
Enter a Name, for example the product name.
-
Enter a Type, for example the kind of sensor.
-
Select the Device class: Class A, Class B or Class C. Select exactly the class the device firmware runs. With a different class, KONA Core sends downlinks when the device isn't listening.
-
Optional: enter a Description.
-
Select Add. The new model appears in the list.
Manufacturer, Name, Type and Device class are required. For editing and deleting models, see Manage Device Models.
Frequency plan. The device model has no region or frequency plan field. It has no payload converter either: see Step 3. The frequency plan comes from the gateway: a gateway takes its plan from its gateway model. Use a device built for the same plan as your gateways, for example EU868 or US915. See Regions & Frequency Plans.
Step 2. Add the device
We recommend OTAA: the device gets new session keys at every join, and KONA Core assigns its device address. Use ABP only if the device doesn't support OTAA. See Device Activation & Classes.
-
In the side menu, select Applications.
-
In your application's row, select the Manage devices icon. The application's devices page opens.
-
Select Add Device (the + icon). The Add Device dialog opens on the Device details tab.
-
Enter a Name for the device.
-
In Device model, start typing the model name, then select your model from the list.
-
Enter the Device EUI: the DevEUI, 16 hexadecimal characters.
-
Enter the Application EUI: the JoinEUI (AppEUI), 16 hexadecimal characters.
-
OTAA only: enter the Application Key, 32 hexadecimal characters. For TEKTELIC devices registered in the Join Server, see Onboard a TEKTELIC Device.
-
Choose the activation method:
- OTAA (recommended): leave ABP activation cleared.
- ABP: select ABP activation. Then continue with step 10.
-
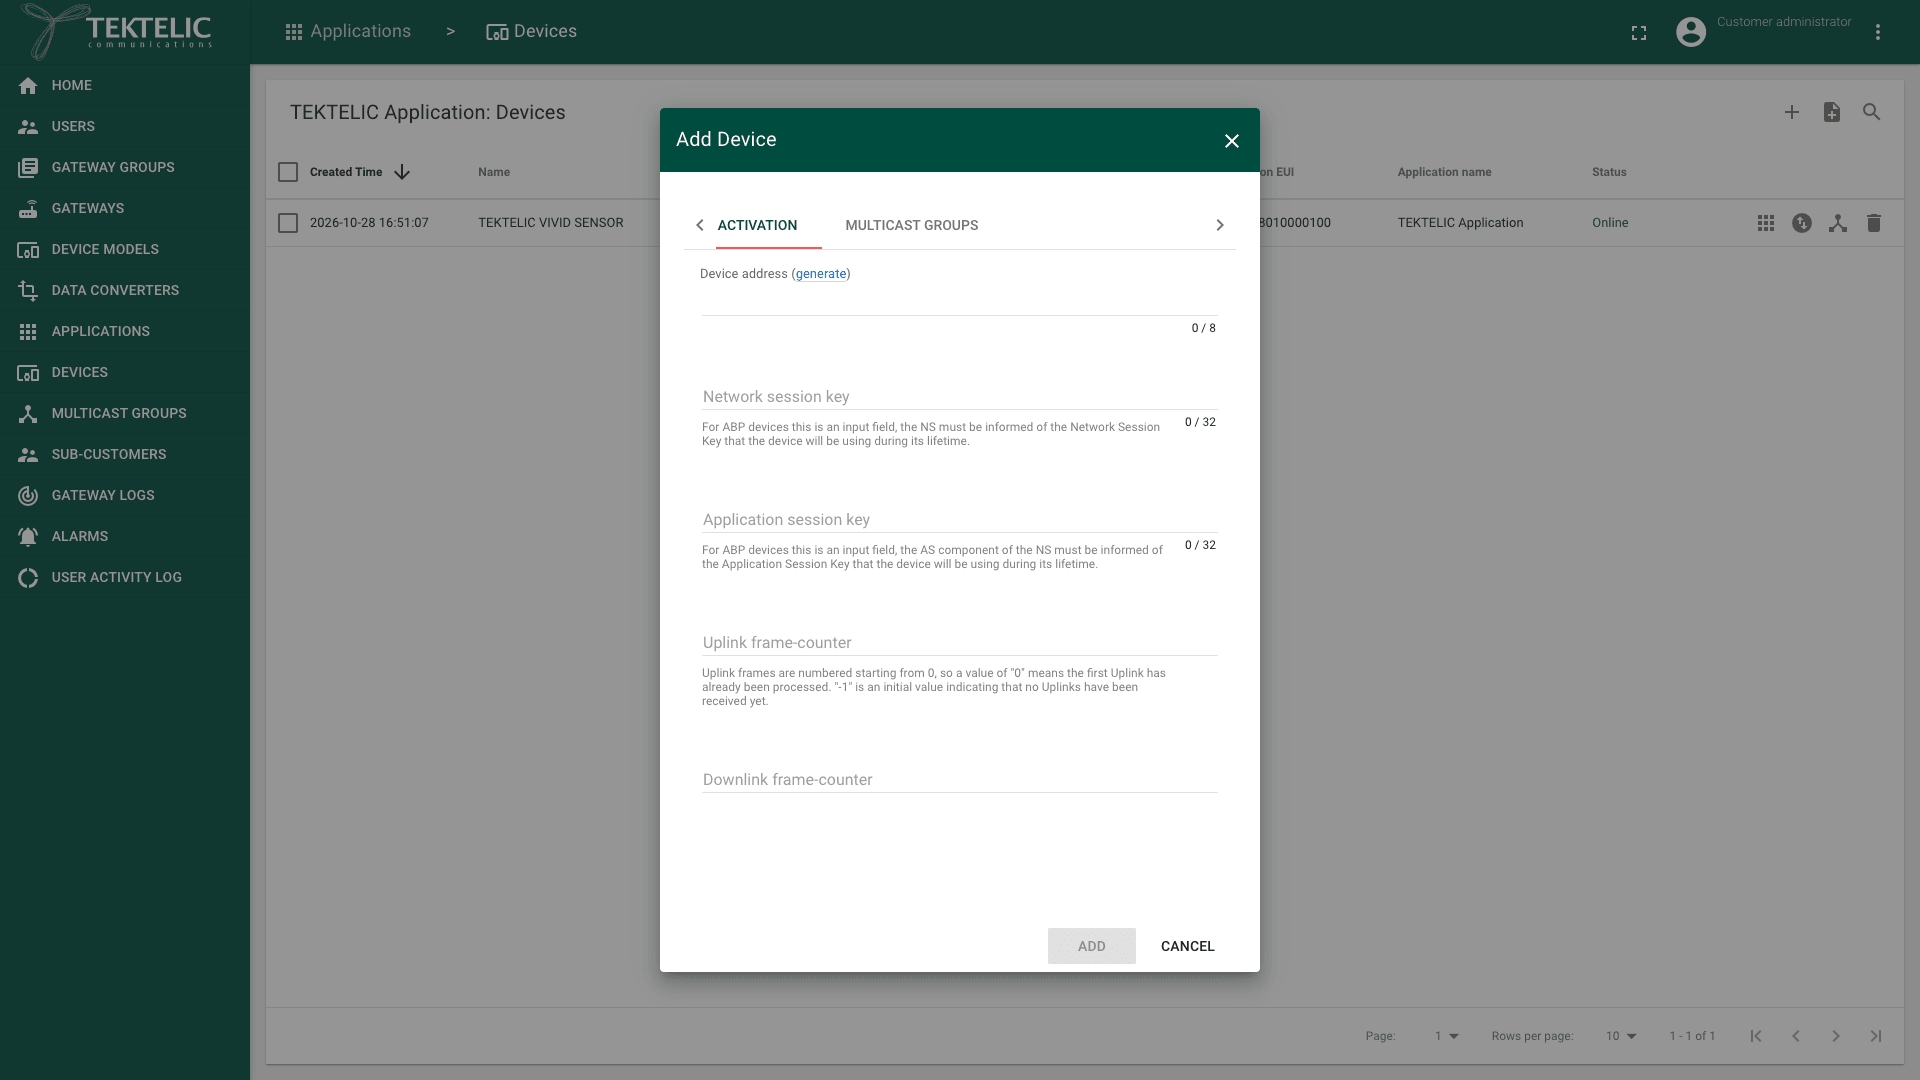
ABP only: select the Activation tab. With ABP activation selected, the key fields are input fields.
-
ABP only: enter the Device address: the DevAddr, 8 hexadecimal characters. Select generate next to the label to let KONA Core fill in a unique address. Set the same address on the device.
-
ABP only: enter the Network session key and the Application session key, 32 hexadecimal characters each.
-
ABP only: set Uplink frame-counter and Downlink frame-counter to match the device's session. The hint explains that
-1means no uplink has been received yet. confirm the values KONA Core uses when the frame-counter fields are left empty.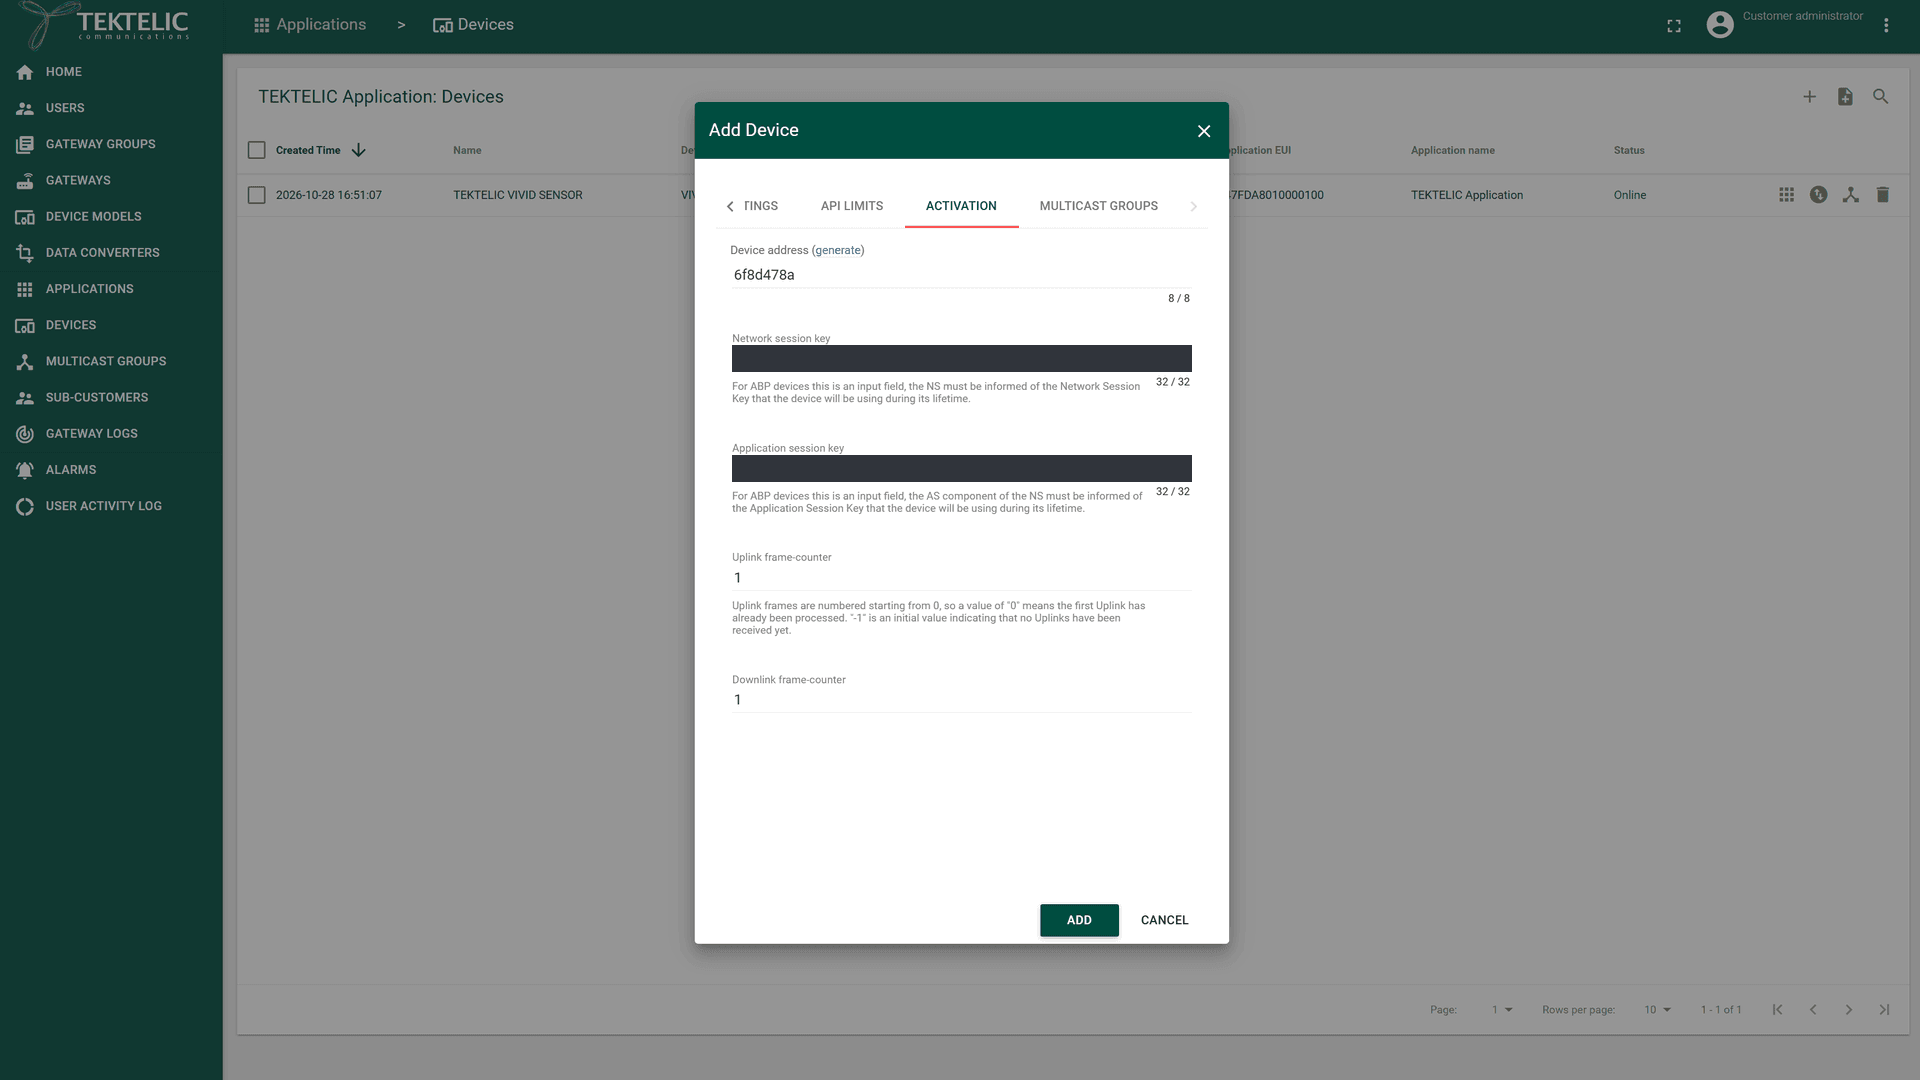
The screenshot shows an example ABP setup with both counters set to
1. Use the counters expected by your device. -
Select Use application settings, so the device uses the network settings of its application. We recommend it. Clear it only if the device needs its own settings. See Network Settings.
-
Select Add. The device appears in the application with the status Offline until it sends its first uplink.
LoRaWAN ABP uses preconfigured session keys rather than an AppKey. The KONA Core dialog still checks Application Key unless Application EUI starts with 647FDA. LoRaWAN doesn't require an AppKey for ABP-only devices, but the current onboarding form requires this field for other Application EUIs. Confirm the supported onboarding procedure.
Treat all keys as secrets. See Security & Keys. To add devices from your own system, use Save device.
Step 3. Attach a data converter
KONA Core decodes a device's payload in the data converter of an integration, not on the device or the device model. An integration forwards the data of all devices in its application, and uses one data converter.
- Write or pick a decoder for the device's payload format. Start from the manufacturer's payload documentation. See Write a Decoder.
- In the side menu, select Data converters, and create the converter with Add Data Converter. See Payload Converters Overview.
- In your application's integration, select this converter in Data converter. See HTTP Integration or MQTT Integration.
Use a decoder and encoder that match each device type's payload format, including for third-party devices. We recommend one application per device type, so each integration uses the appropriate converter.
A Custom v2 decoder receives input.tektelicMetadata, including deviceEui, deviceModelId and deviceModelName. Your decoder can use these fields to distinguish device types when an application contains several types.
Step 4. Turn on the device
- Turn on or reset the device near the gateway, as described in its documentation.
- With OTAA, the device sends a join request first. With ABP, it sends uplinks right away.
Check the result
- In the side menu, select Devices.
- Check that your device's Status changes to Online.
- Select the device's name. The Device details panel opens.
- Select the Real-time packets tab. For OTAA, you see Join Request and Join Accept in the Message Type column. Then each uplink shows as Uplink, with the Gateway and the raw Payload.
- Check that your system receives the decoded values through the integration. If the integration reports a decoding failure, KONA Core raises the event
INTEGRATION_UL_DECODING_FAILURE. See Integration Monitoring.
For the statuses, see Device Activity & Status.
Troubleshooting
| Symptom | Likely cause | What to do |
|---|---|---|
| OTAA: Real-time packets shows Join Request but no Join Accept. | The Device EUI, Application EUI or Application Key doesn't match the device. | Compare them with the manufacturer's values, character by character. On the Alarms page, look for device events such as DEVICE_CANNOT_JOIN, LORA_MIC_FAILURE or UNKNOWN_DEVICE. DEVICE_CANNOT_JOIN reports repeated join requests without subsequent uplinks. LORA_MIC_FAILURE reports a failed message integrity check; UNKNOWN_DEVICE reports an unrecognized device. See Alarms & Events Reference. |
| No packets at all. | No gateway in range is online, or the device uses another frequency plan than the gateway. | Check that a gateway near the device shows Online. Compare the device's plan with the plan of the gateway model. See Regions & Frequency Plans. |
| ABP: uplinks stop after the device restarts. | The device reset its frame counter, and KONA Core rejects counters it has already seen. | See Device Session & Frame Counters. Use OTAA if the device supports it. |
| Uplinks arrive, but your system receives no values or wrong values. | The decoder doesn't match the device's payload format. | Test the decoder with a raw payload from Real-time packets. See Write a Decoder. |
| Add shows | The Customer's subscription allows 1 device, and that limit is reached. | Remove a device you no longer need, or request a larger plan. See Subscription Plans & Limits. |
The Alarms page is available to all roles except System roles. You see a device's alarms only if you have access to that device.
Still stuck? A Sub-Customer contacts their Customer, a Customer contacts their Provider, and a Provider contacts TEKTELIC Support. Send the DevEUI, the device's manufacturer and model, the time in UTC, the exact error message and a screenshot. Never send keys.