Events over MQTT
Overview
Receive TEKTELIC KONA Core Network Server events in your own system over MQTT. You add an MQTT notification to an alarm rule. KONA Core then connects to your MQTT broker and publishes a message to your topic each time a trigger of the rule fires. Your monitoring system subscribes to that topic.
This guide covers events and alarms only. To receive device data over MQTT, use an MQTT integration instead: see MQTT Integration.
Before you start
- Role: Customer administrator or Sub-Customer administrator for application rules. User roles open alarm rules read-only. For gateway group rules, see Configure Gateway Group Alarm Rules.
- Application: an application with the devices or integrations you want to watch. See Manage Applications.
- MQTT broker: your own broker, reachable from the internet by its IP address or domain name. KONA Core connects to it as a client.
- Broker credentials: a username or token and a password for KONA Core, if your broker requires them. For TLS with client authentication, also the CA certificate, the client certificate and the client private key.
- MQTT client: a client on your side to check the messages, for example
mosquitto_subfrom the Eclipse Mosquitto project.
Steps
Step 1. Open the alarm rule
- In the side menu, select Applications.
- Select your application in the list. The Application details panel opens.
- Select the Alarm Rules tab. The tab isn't shown in edit mode.
- Select Add Alarm Rule (the + icon). The Add Alarm Rule dialog opens. To add MQTT to an existing rule, select its edit icon (the pencil) instead.
- Enter a Name.
- Select ADD ALARM TRIGGER, and select the trigger in Type. Add both triggers of a pair, for example Integration is disconnected and Integration is connected. Your system then sees when a problem starts and when it ends.
Only the triggers in the rule reach your broker. For the full list, see Configure Application Alarm Rules.
Step 2. Add the MQTT notification
-
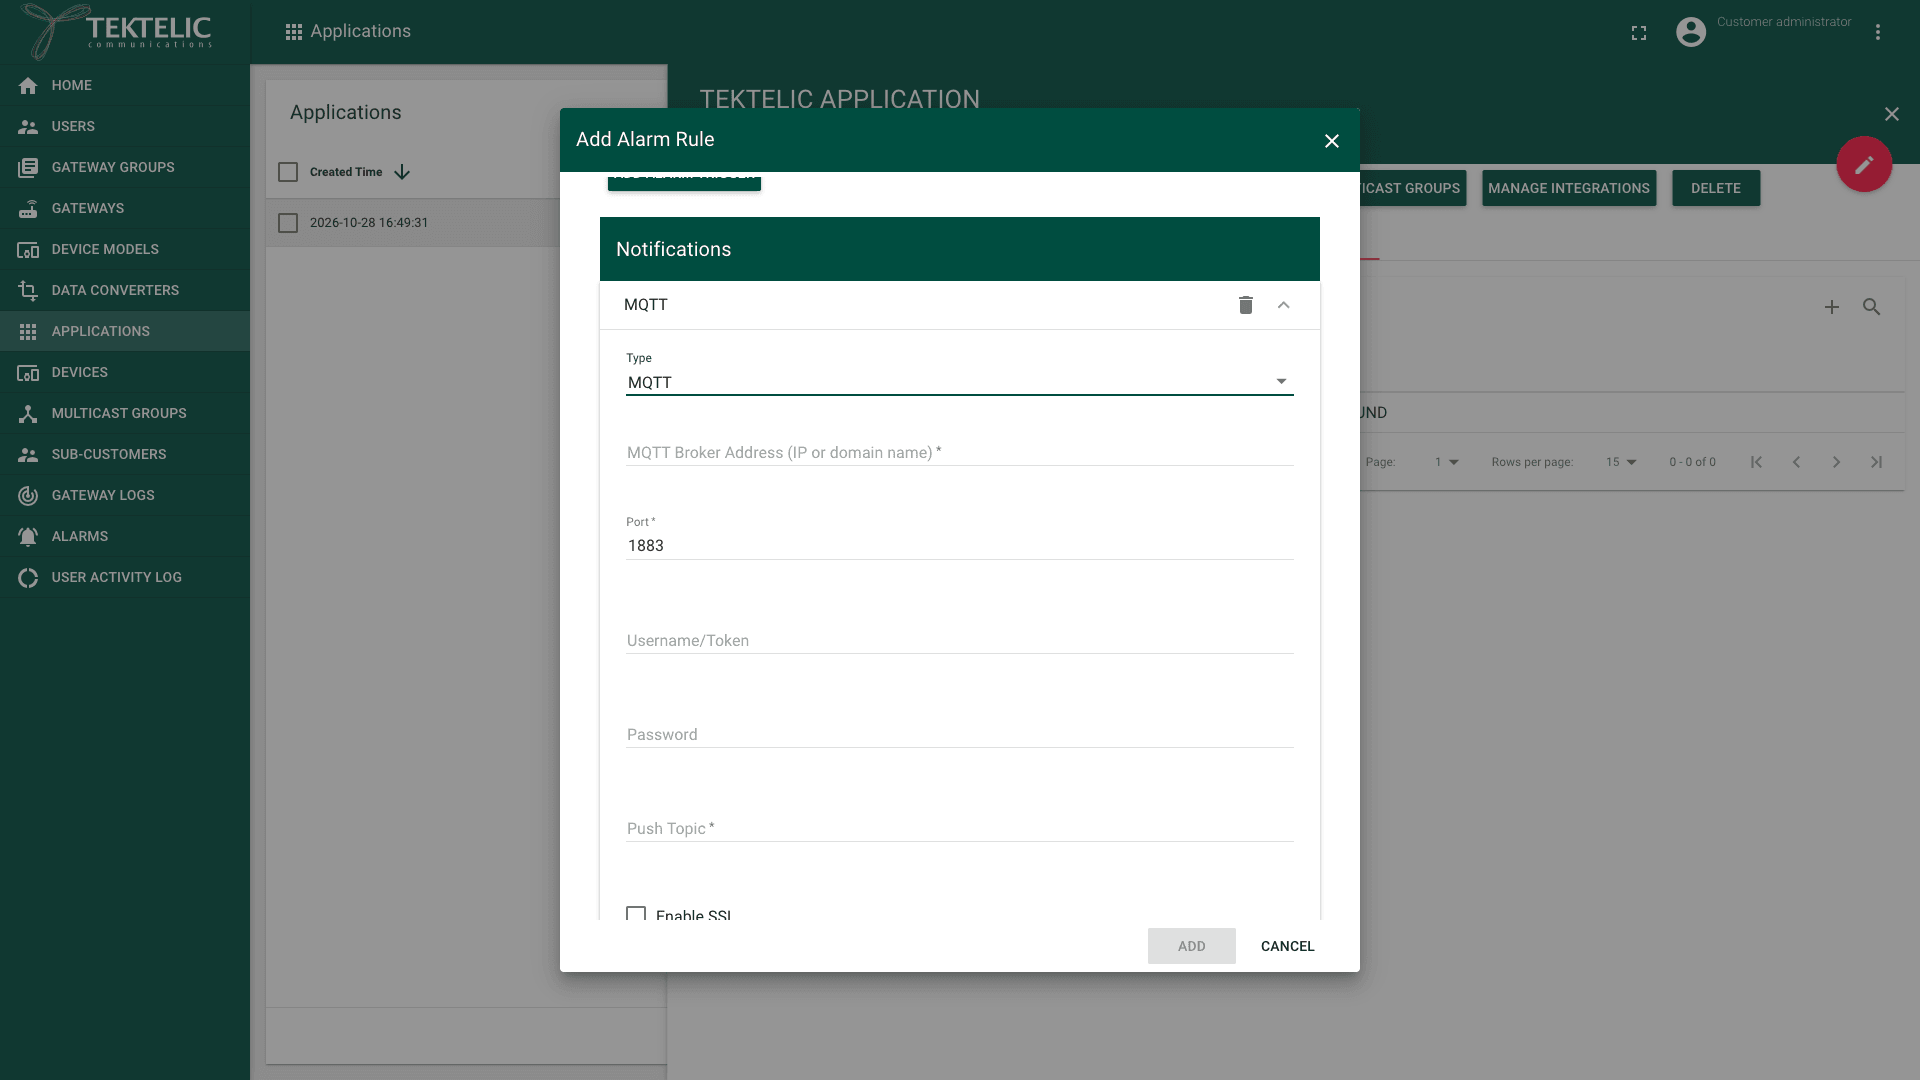
Select ADD NOTIFICATION. A notification panel appears with Type set to Email.
-
In Type, select MQTT. The MQTT fields appear.
-
Enter the MQTT Broker Address (IP or domain name): the IP address or domain name of your broker, without a protocol prefix. The address is required. confirm that the address must not include a protocol prefix such as
ssl://. -
Enter the Port of your broker. The port is required. The default is
1883, the standard port for MQTT without TLS. With TLS, enter your broker's TLS port, usually8883. -
Enter the Username/Token that KONA Core uses to sign in to your broker. Leave it empty if your broker doesn't need it.
-
Enter the Password for that username.
-
Enter the Push Topic: the topic KONA Core publishes the events to. The topic is required. We recommend a dedicated topic per application, so your system knows where each event comes from. confirm whether the Push Topic supports placeholders, for example the application or device ID.
-
Select Enable SSL. It's cleared by default. We recommend TLS, so the event data and the broker password don't travel in clear text.
-
Optional: change Retry interval (seconds). The default is
30. confirm what KONA Core retries at this interval: the connection to the broker, the message, or both. -
Optional: upload the CA certificate of your broker, and the Client certificate and Client private key if your broker authenticates clients by certificate. Use the upload icon next to each field. confirm the accepted file formats, for example PEM.
-
Select ADD. The button is available once every required field is filled in. The rule appears on the Alarm Rules tab. For an existing rule, select SAVE.
The MQTT notification has no subject or body, and the dialog shows no references for it. KONA Core defines the message itself.
Topics and message format
KONA Core publishes to the Push Topic you enter. confirm the QoS level and the retain flag of the messages, and the MQTT client ID that KONA Core uses.
KONA Core publishes a JSON event object. It contains id, entityId, source, entityName, eventName, eventType, severity, ituType, state, probableCause, correctiveActions and timestampMillis.
Example core fields, with fictitious identifiers:
{
  "id": "00000000-0000-0000-0000-000000000001",
  "entityId": "00000000-0000-0000-0000-000000000002",
  "source": "DEVICE",
  "entityName": "Example sensor",
  "eventName": "DEVICE_DATA_REPORTING_INTERVAL_EXCEEDED",
  "eventType": "OFFLINE",
  "severity": "MAJOR",
  "state": "RAISED",
  "timestampMillis": 1767225600000
}
The timestamp uses Unix milliseconds. The event values that the API returns for an event are listed in Get all enhanced events. For the meaning of each event name, see Alarms & Events Reference. Device data messages from integrations have a different format: see Message Formats.
Step 3. Subscribe with a client
On a computer that can reach your broker, subscribe to the Push Topic. This example uses mosquitto_sub with TLS. Replace the values in angle brackets with your own:
mosquitto_sub -h <broker-address> -p 8883 \
  --cafile <ca-certificate-file> \
  -u <username> -P <password> \
  -t '<push-topic>' -v
Without TLS, use -p 1883 and leave out --cafile. The client waits and prints each message with its topic.
Check the result
- On the Alarm Rules tab, check that the rule appears in the list.
- Keep your MQTT client subscribed to the Push Topic.
- Cause a trigger on purpose, on a test device or test integration. For example, put Device is offline and Device is online in the rule. Switch off a test device until KONA Core raises the alarm, then switch it on again.
- Check that your client prints one message for the raise and one for the clear. confirm the typical delay between the alarm and the MQTT message.
- Compare each message with the record on the Alarms page. See Work with Alarms.
Troubleshooting
| Symptom | Likely cause | What to do |
|---|---|---|
| The alarm appears on the Alarms page, but no message arrives. | KONA Core can't reach your broker: a wrong address or port, or a firewall that blocks the connection. | Check MQTT Broker Address (IP or domain name) and Port. Check that your broker accepts connections from the internet on that port. |
| Your broker logs a failed sign-in. | Username/Token or Password doesn't match the broker's settings. | Enter the credentials again in the rule. Check the user's rights to publish to the Push Topic on your broker. |
| The connection fails with TLS. | Enable SSL is selected, but Port is the plain MQTT port. Or the broker's certificate isn't trusted. | Enter the broker's TLS port. Upload the broker's CA certificate. |
Still stuck? A Sub-Customer contacts their Customer, a Customer contacts their Provider, and a Provider contacts TEKTELIC Support. Send the application name, the rule name, your broker address and port, the time in UTC and the error from your broker's log.
Related
- Alarms & Events Reference
- Message Formats
- Alarm Notifications
- Configure Application Alarm Rules
- Configure Gateway Group Alarm Rules
- MQTT Integration
- Events & Alarms
- API Reference: to poll events instead of receiving them, use Get raised enhanced events and Get all enhanced events.